Screenshots Stellar Repair for Outlook

  • Step 1

    Select PST Files

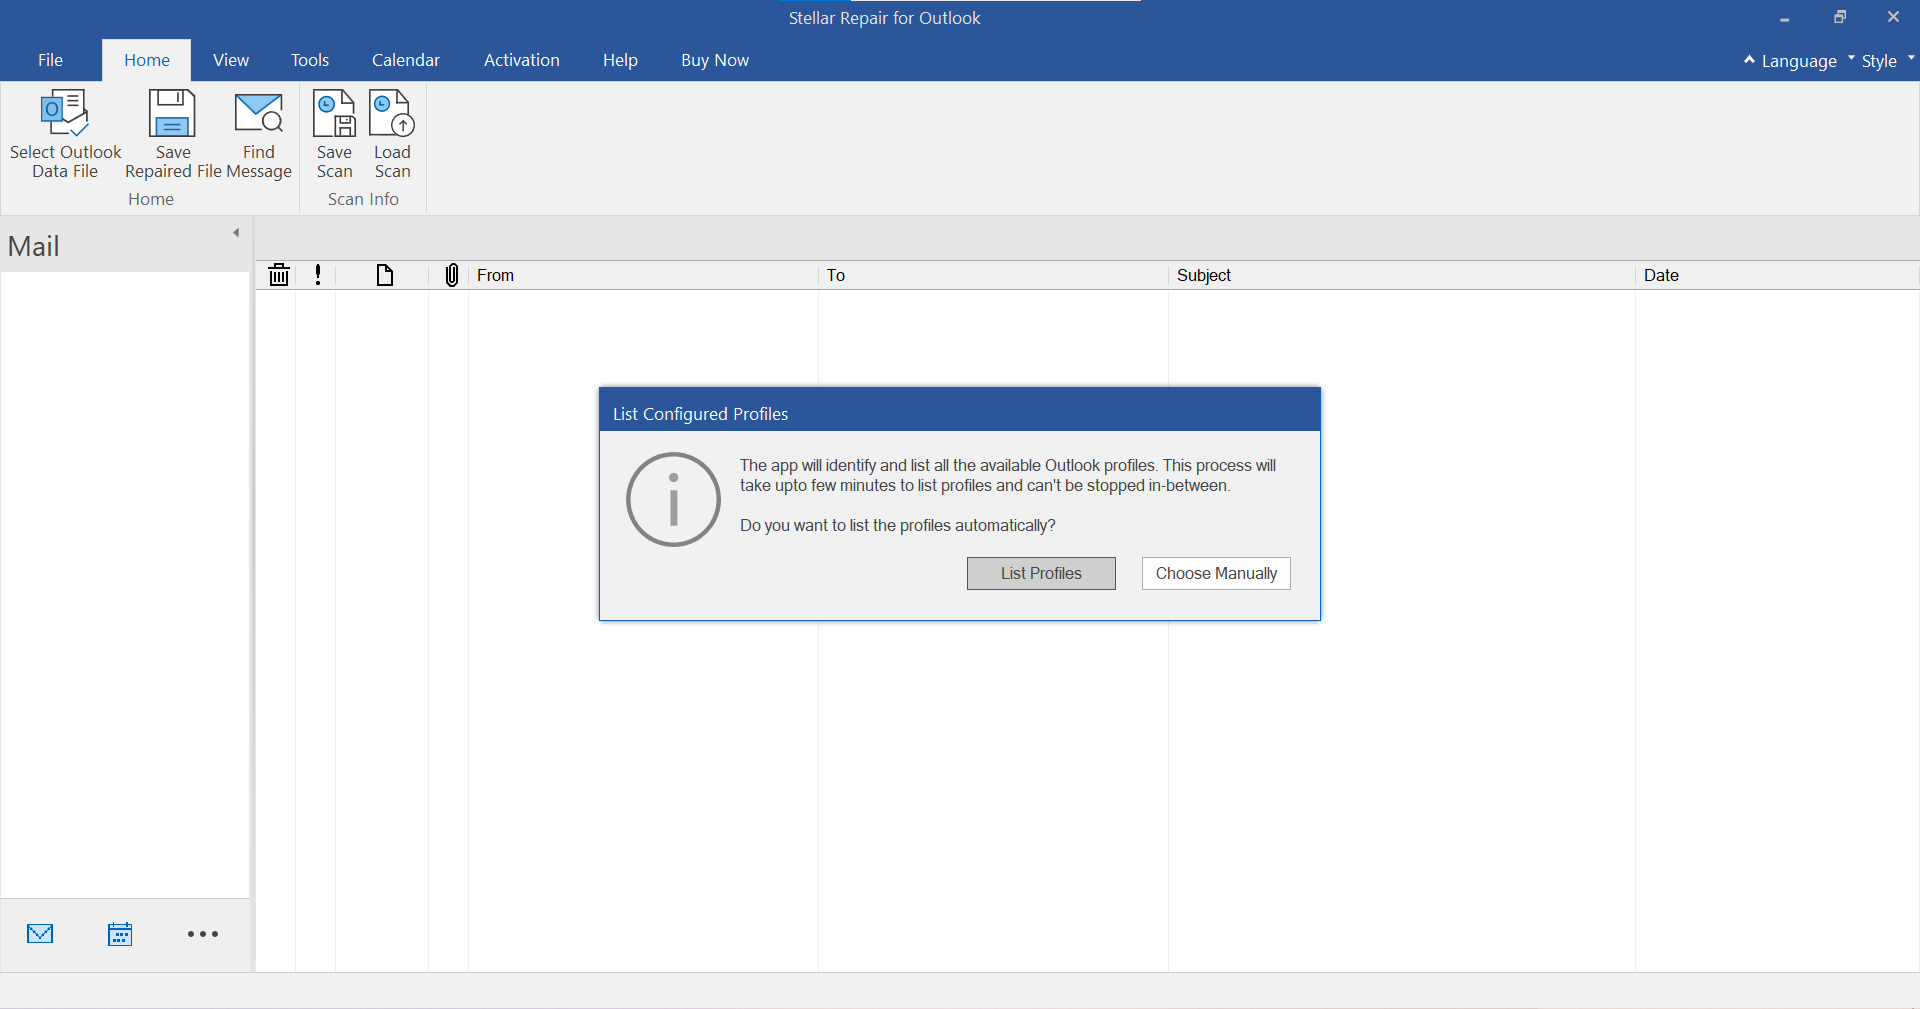
    Launch Stellar Repair for Outlook. In the List Configured Profiles pop-up window, select List Profiles. It will list all the PST files from the default location. If you want to select the PST file manually or from a different location, click the Choose Manually option.

  • Step 2

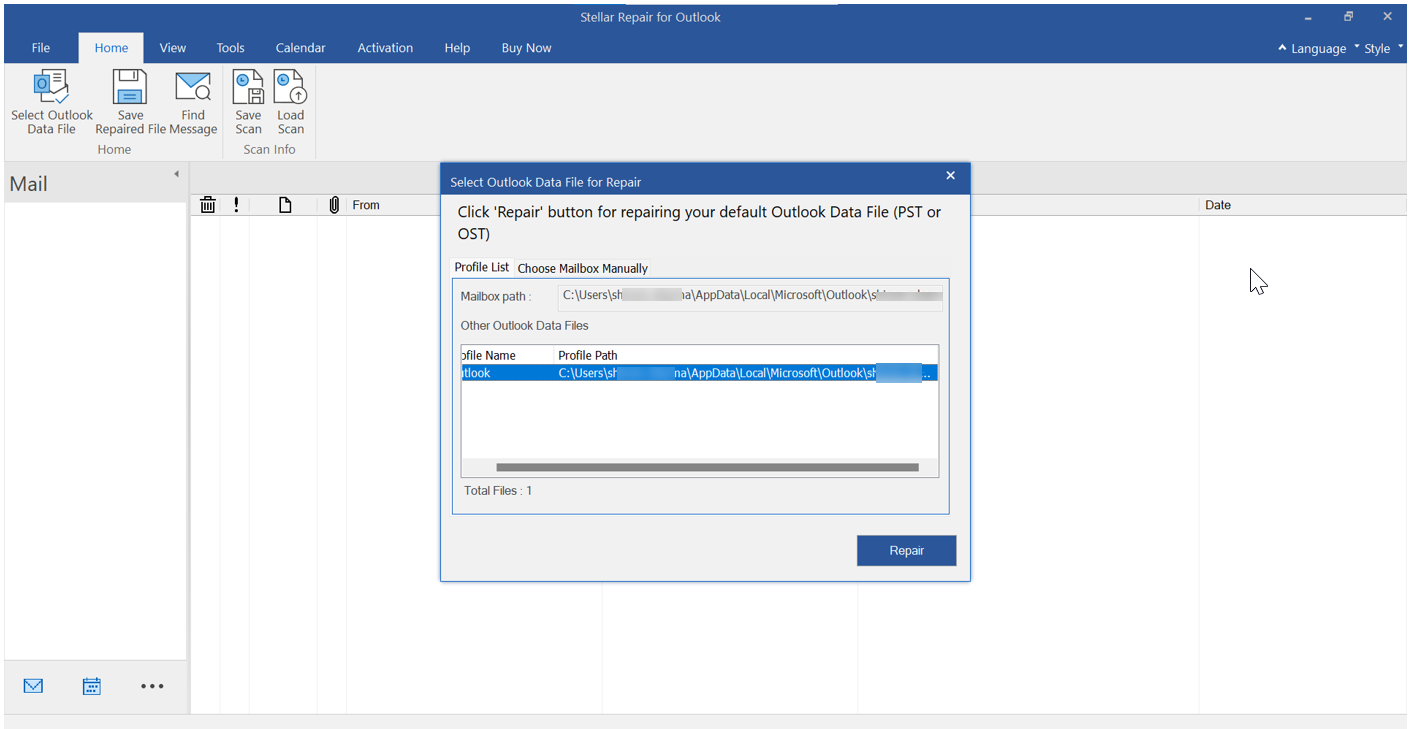
    Click the “Profile List” option to select PST files automatically

    After selecting the PST file that you want to repair, click Repair.

  • Step 3

    For manual selection, click Choose Manually to Select PST Files

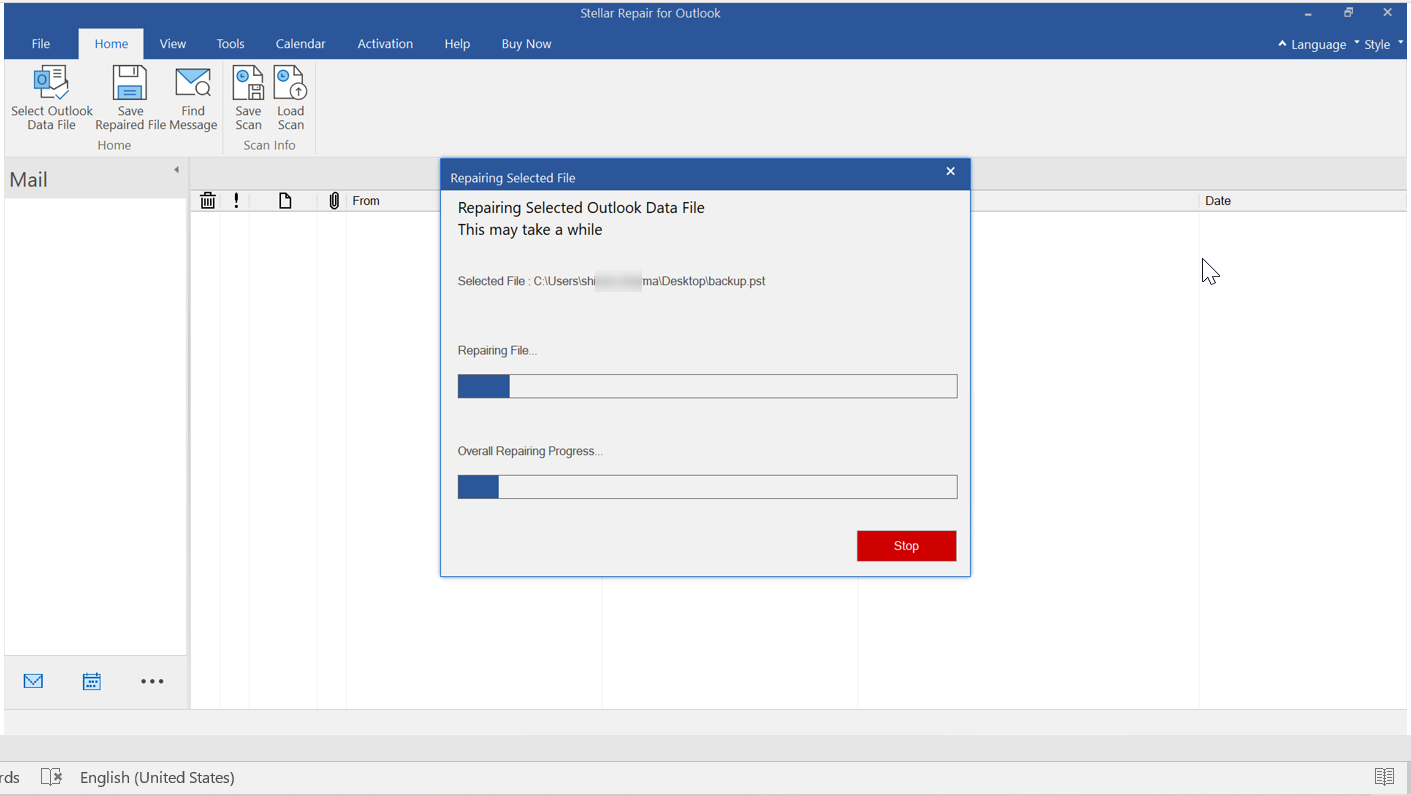
    The tool will start scanning the selected PST file. You can see the scan progress in the progress bar.

  • Step 4

    Click Repair to Scan the PST Files

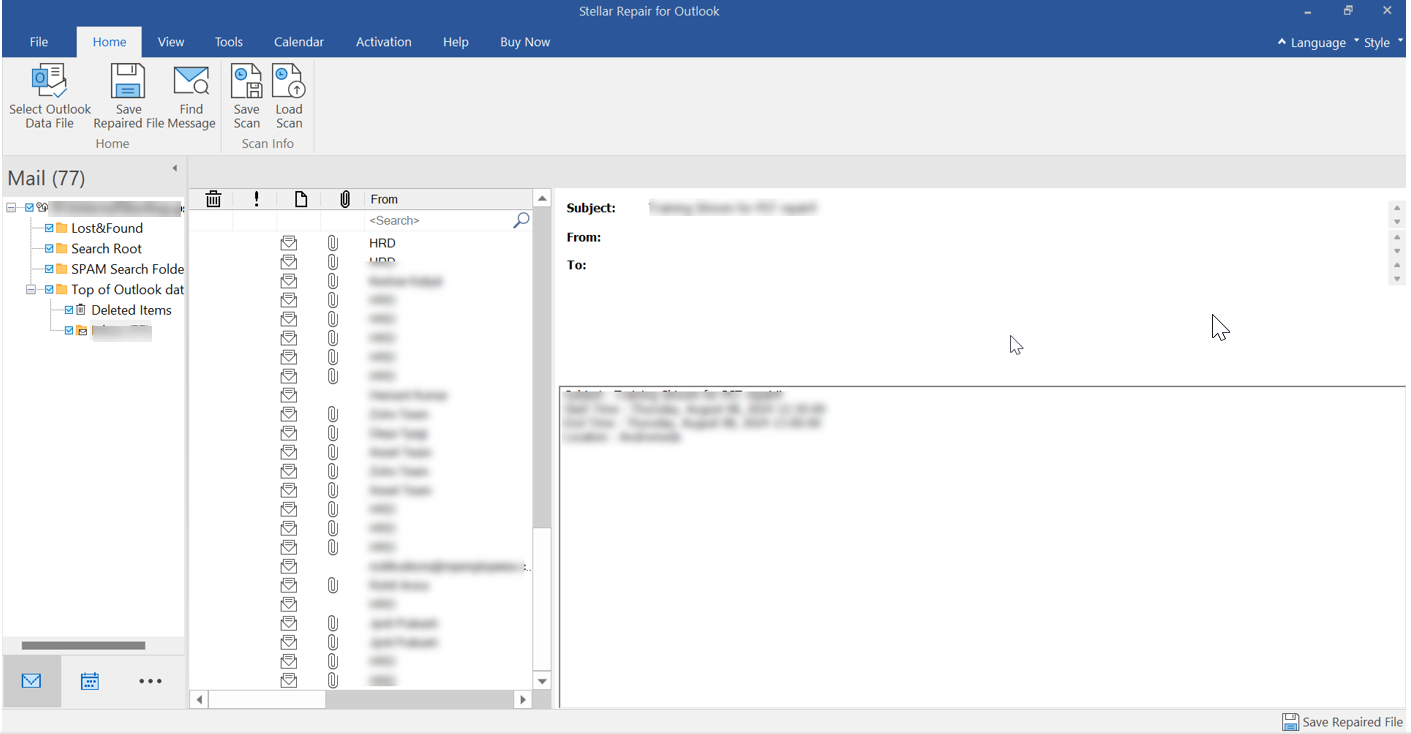
    After the scanning is complete, the tool will list all the PST file items. You can click on any item to see its preview.

  • Step 5

    Preview of Mailbox Items

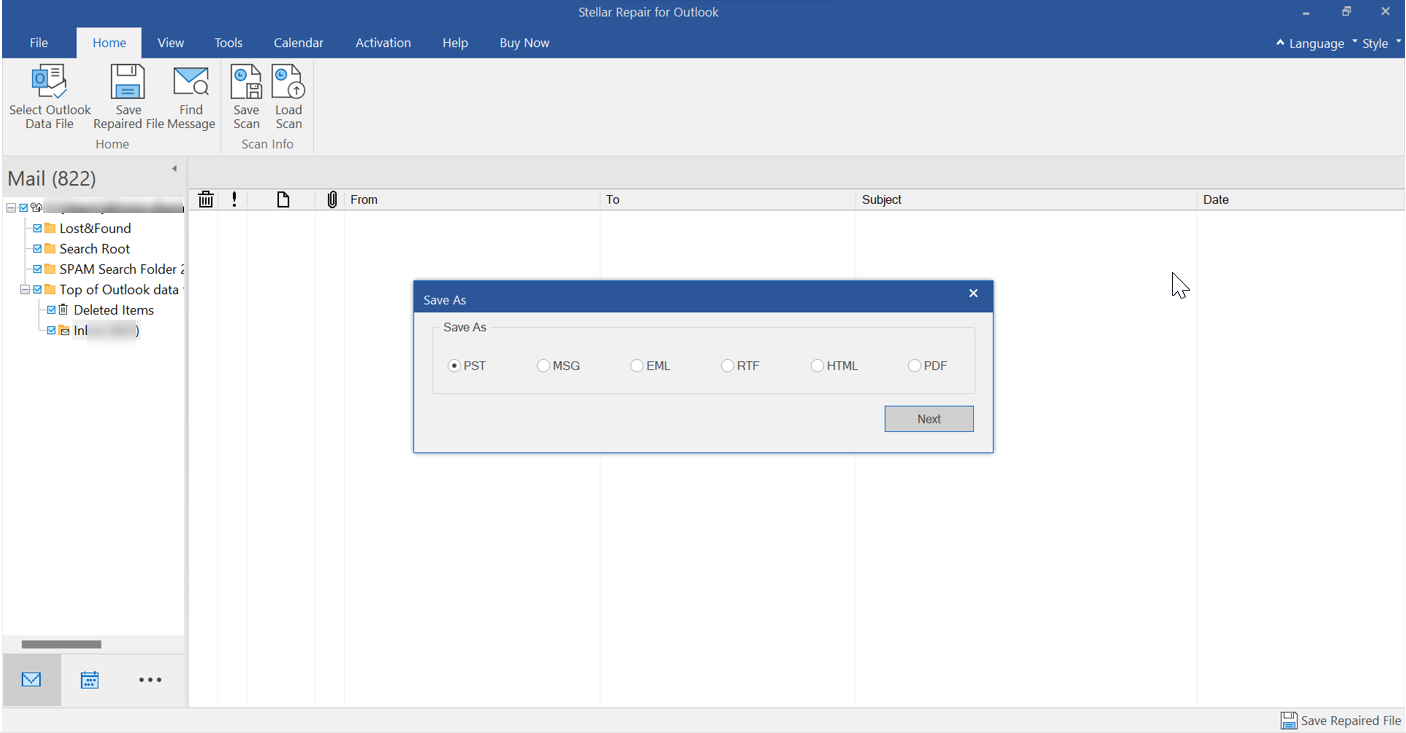
    Select the items you want to save and click Save Repaired File. In the Save as pop-up window, select the desired file format (for example, PST) and then click OK.

  • Step 6

    Multiple Savings option

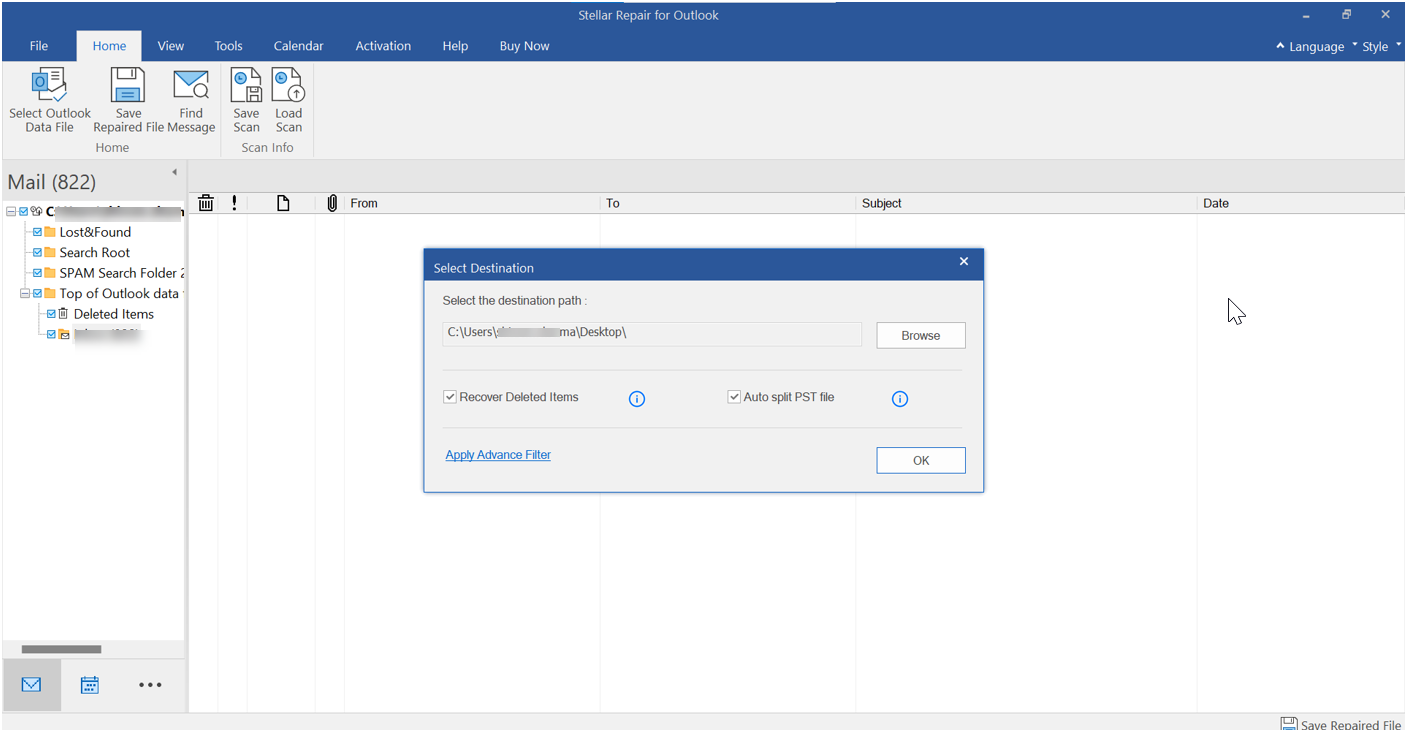
    In the Select Destination window, click browse and select the desired location to save the PST file. You can select the Recovered Deleted Items and Auto Split PST file options, if required. You can also choose to Apply Advance Filter to filter the items. When done, click OK.

  • Step 7

    Choose the location to save the file

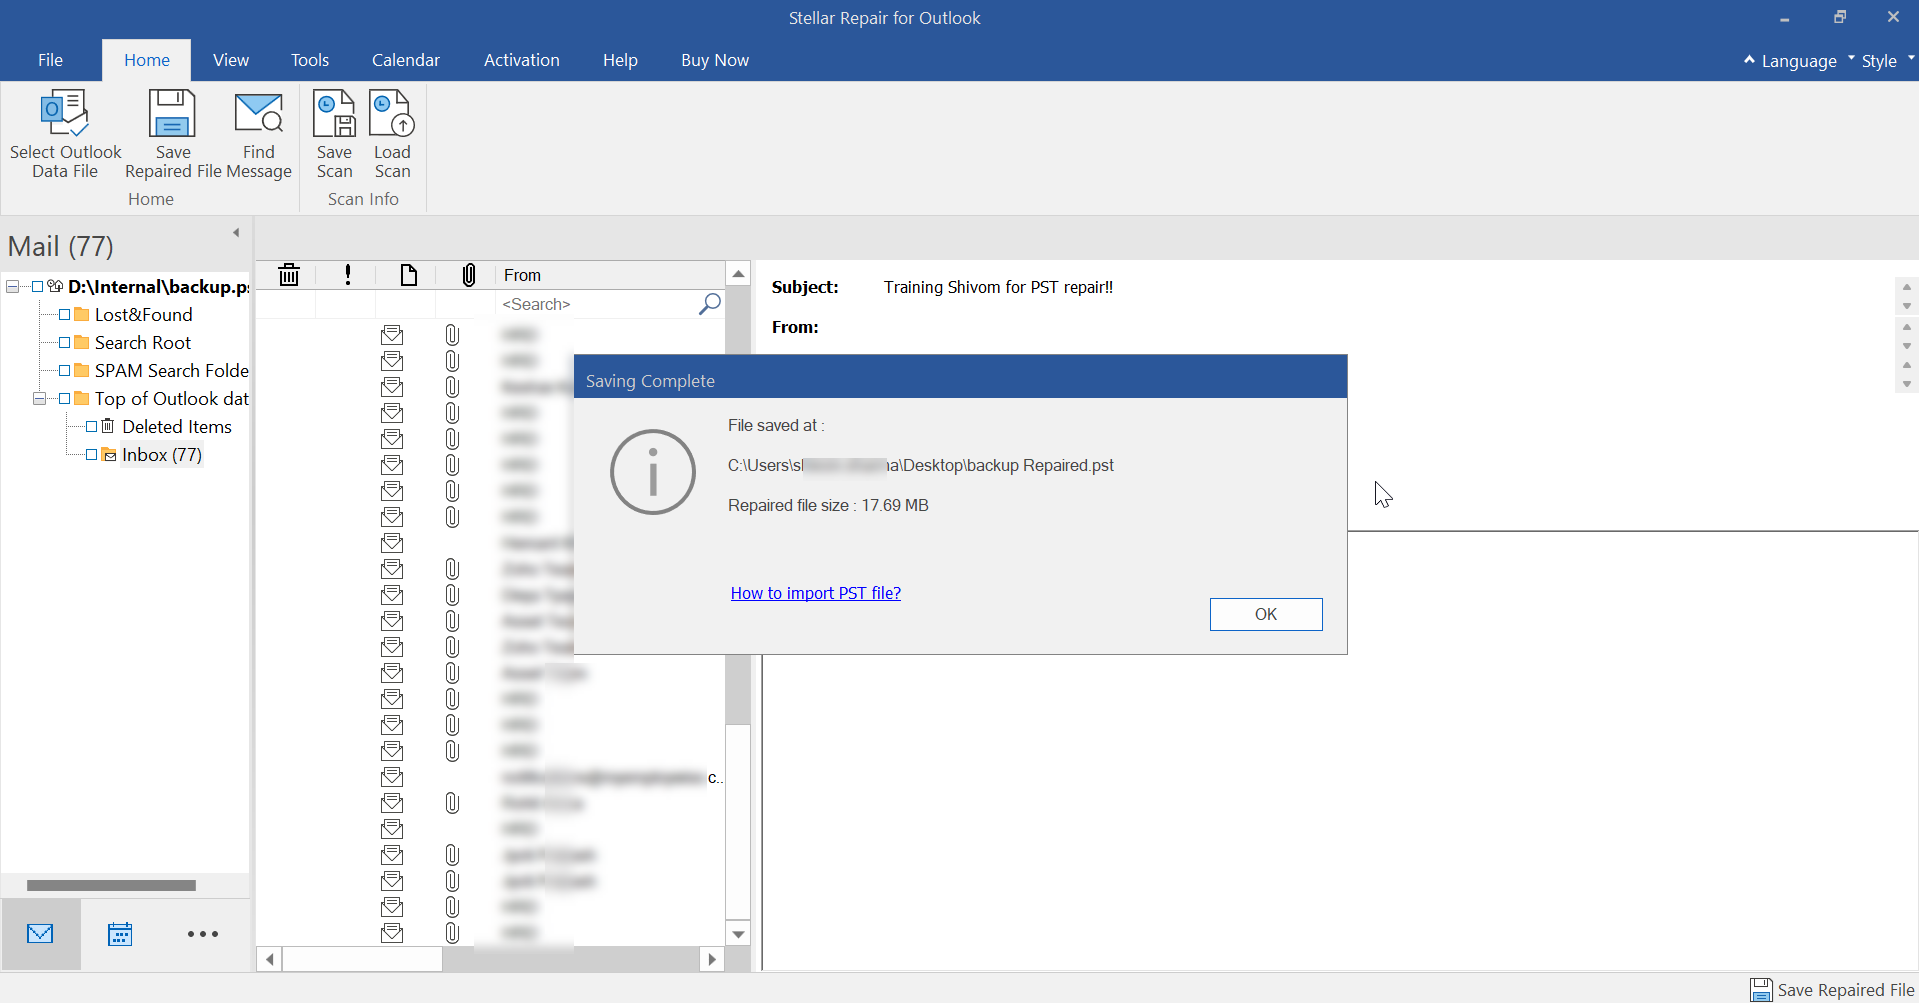
    When the saving process is complete, it will show a Saving Complete message. Click OK.

  • Step 1

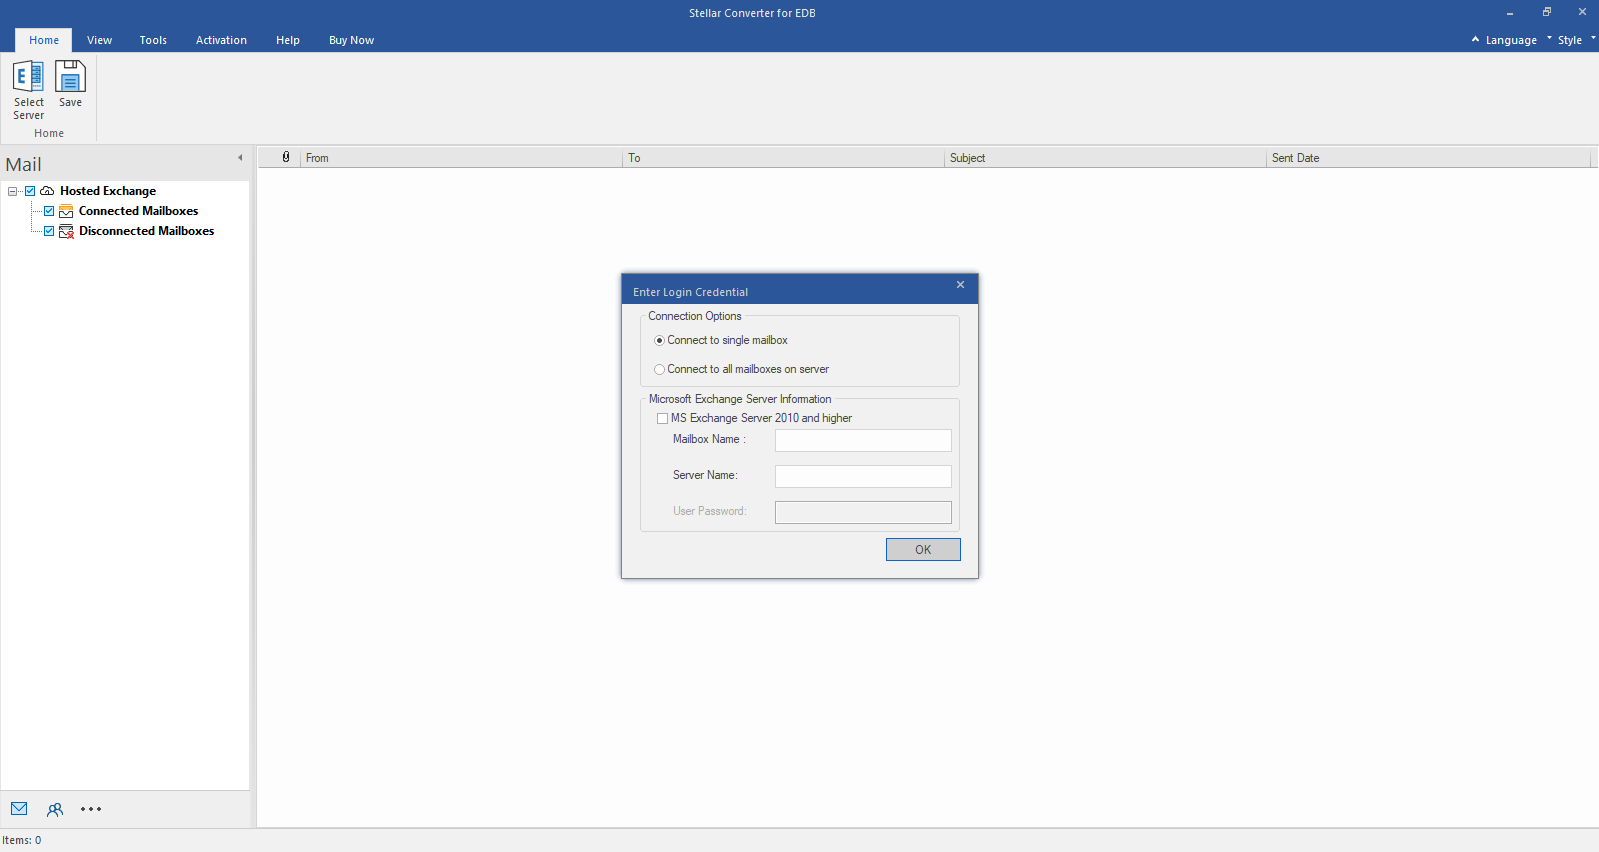
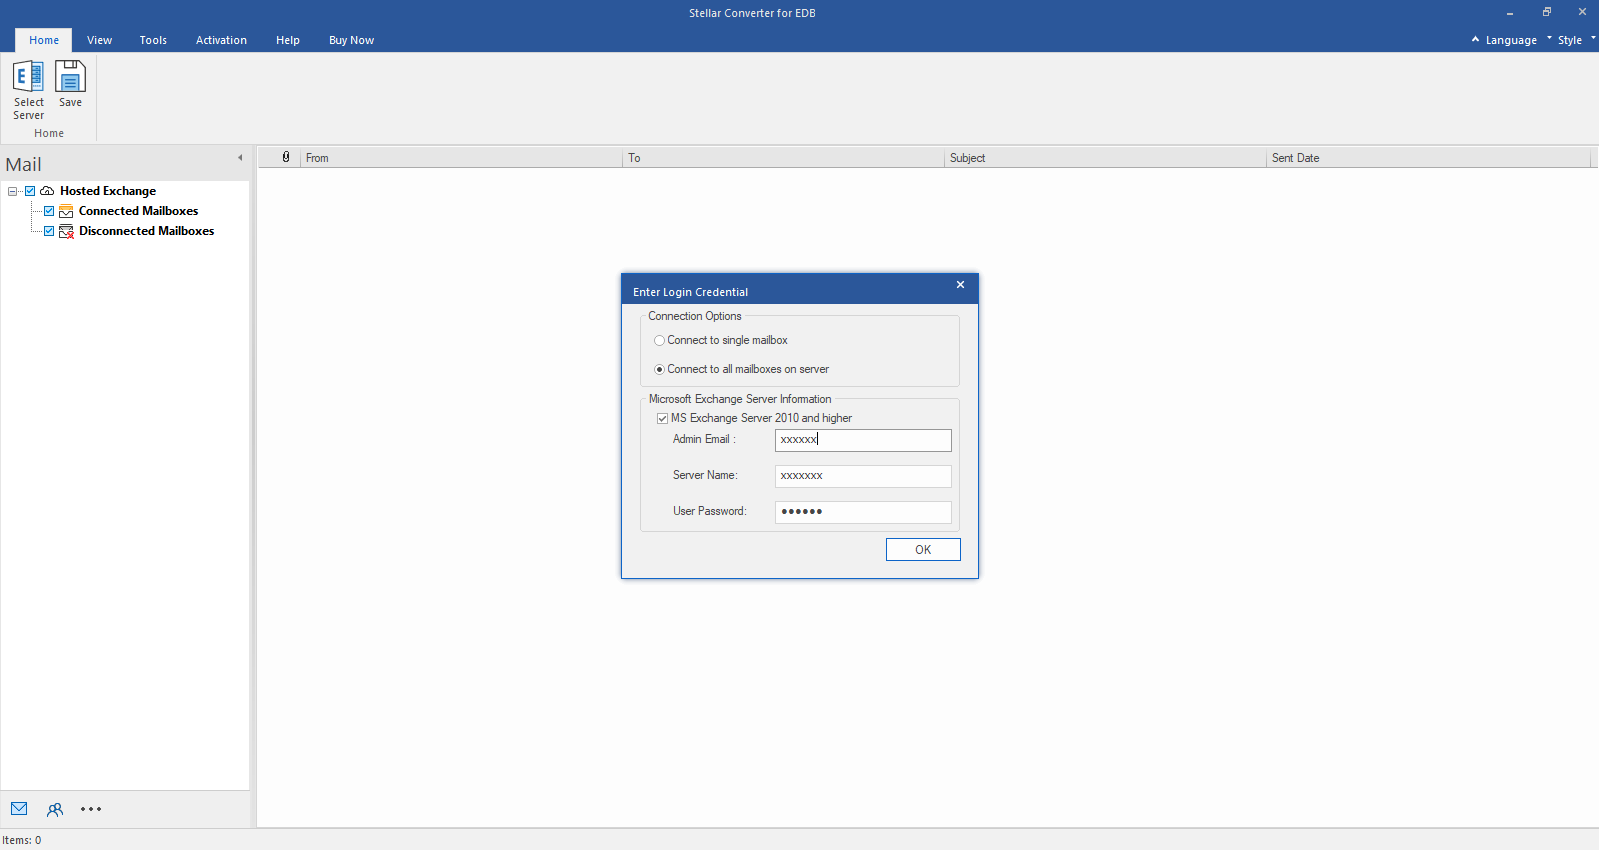
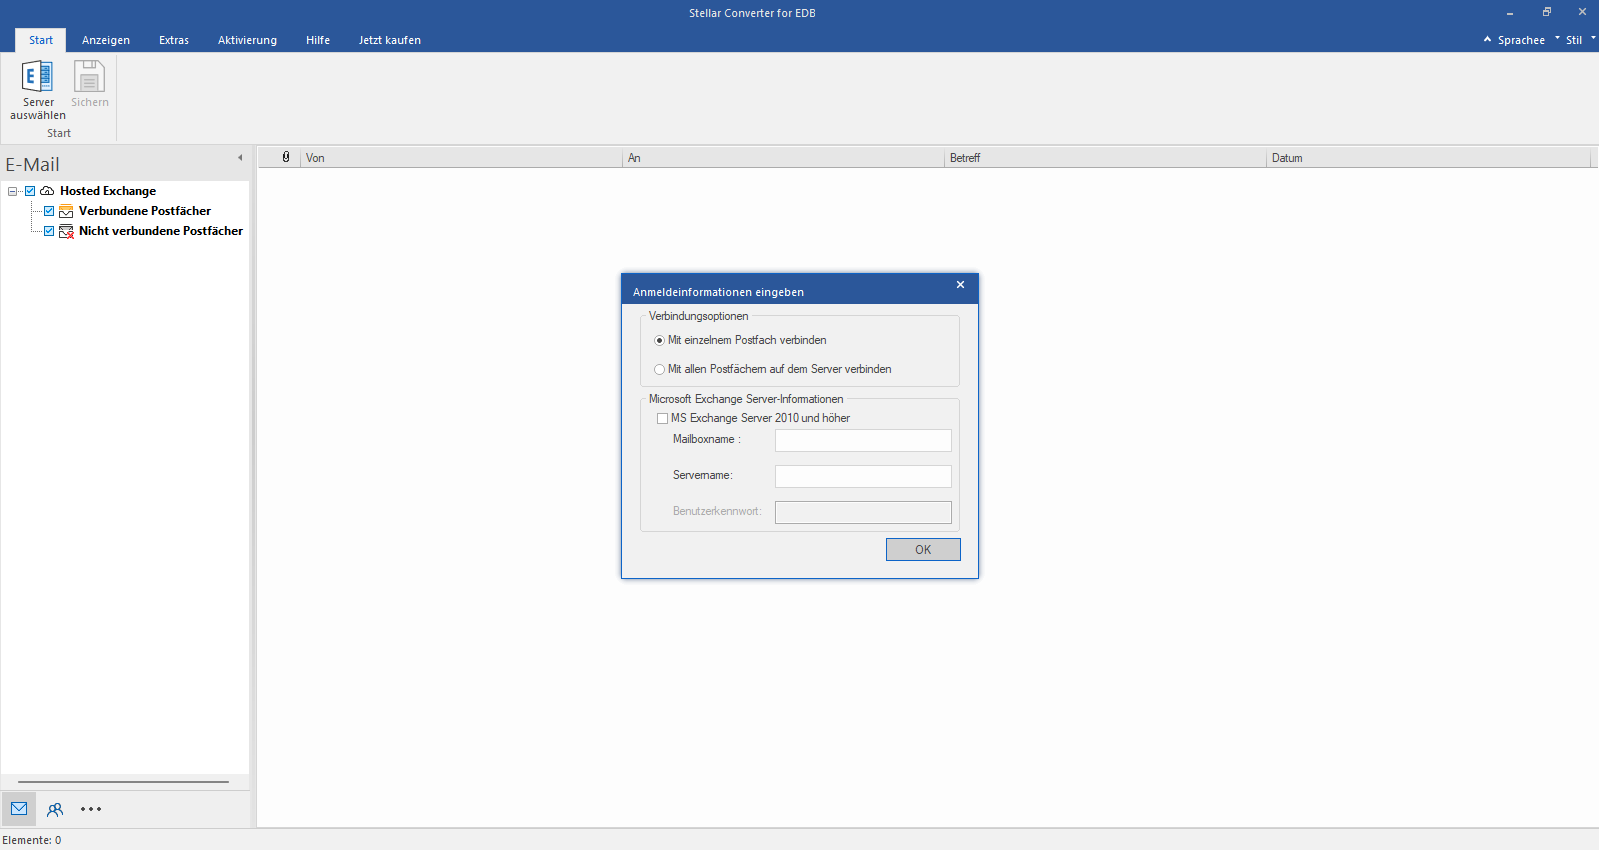
    Select Hosted Exchange and Enter login details

    Select Hosted Exchange to export mailboxes from an online EDB file. Select Connect to Single Mailbox or Connect to Single Mailbox from Connection Options

  • Step 2

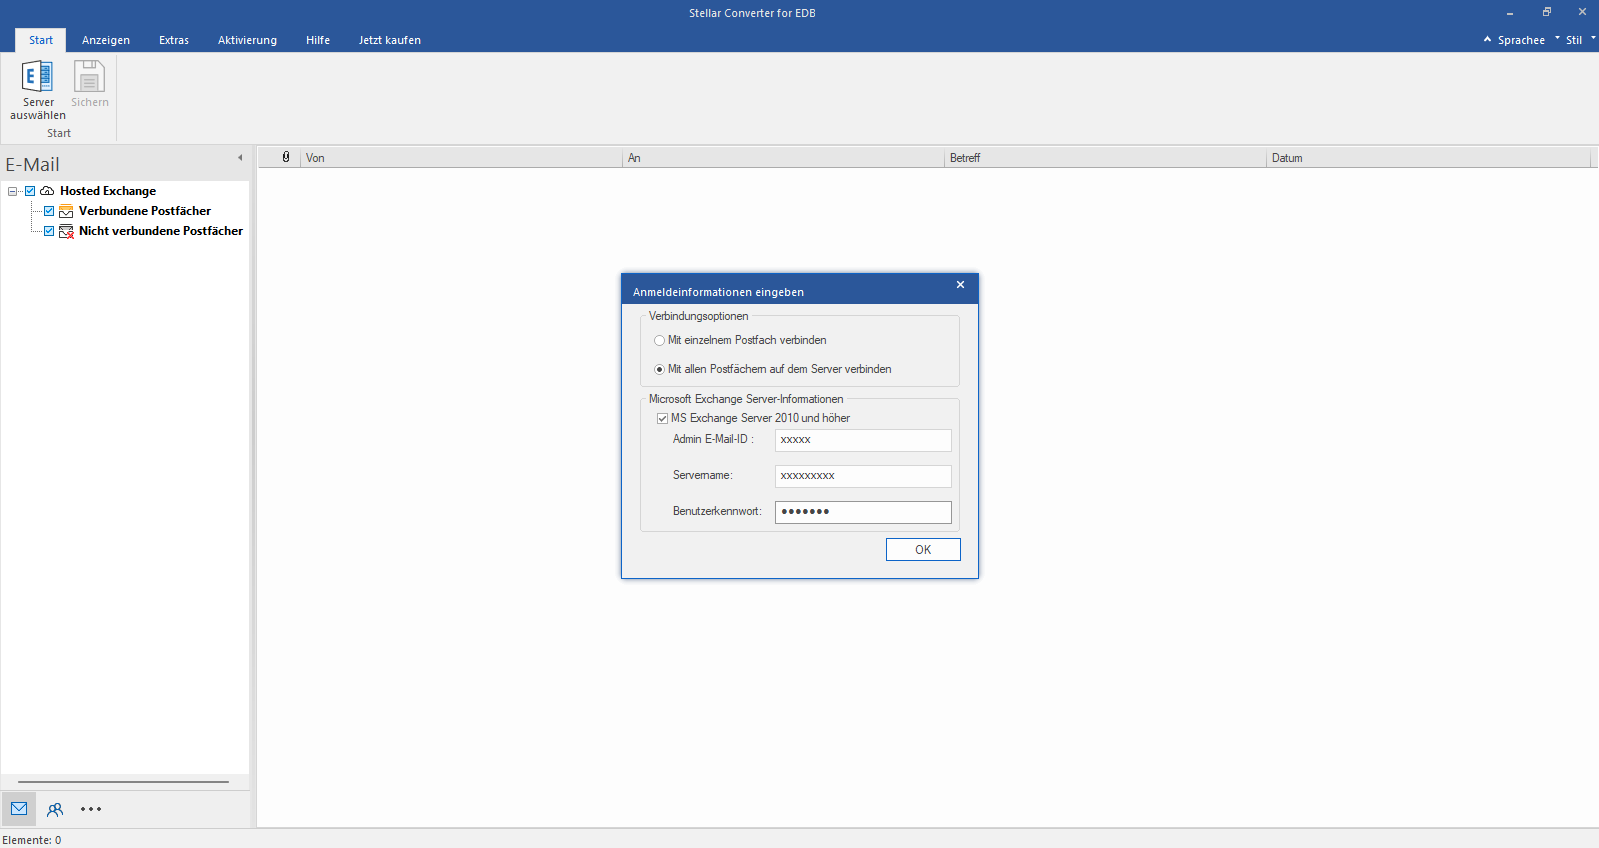
    Enter Admin Email and Server Name

    Enter Admin and Server Name (for Exchange 5.5, 2000, 2003, 2007) or tick "Exchange Server 2010 and higher" checkbox to enter Admin Email, Server Name and Password (for MS Exchange 2010, 2013, 2016, and 2019). Click OK.

  • Step 3

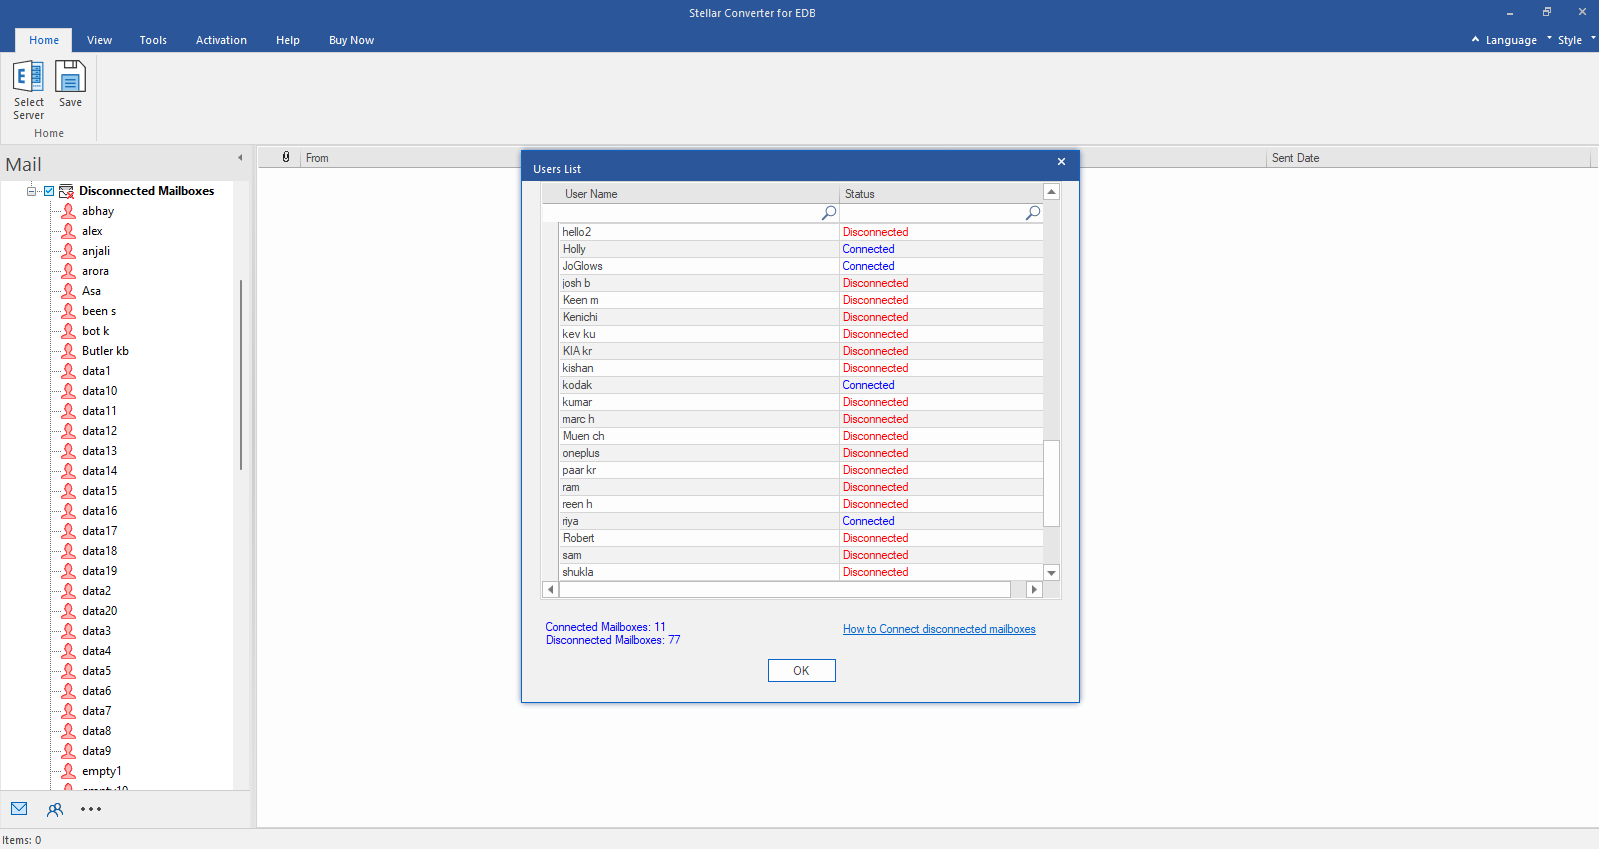
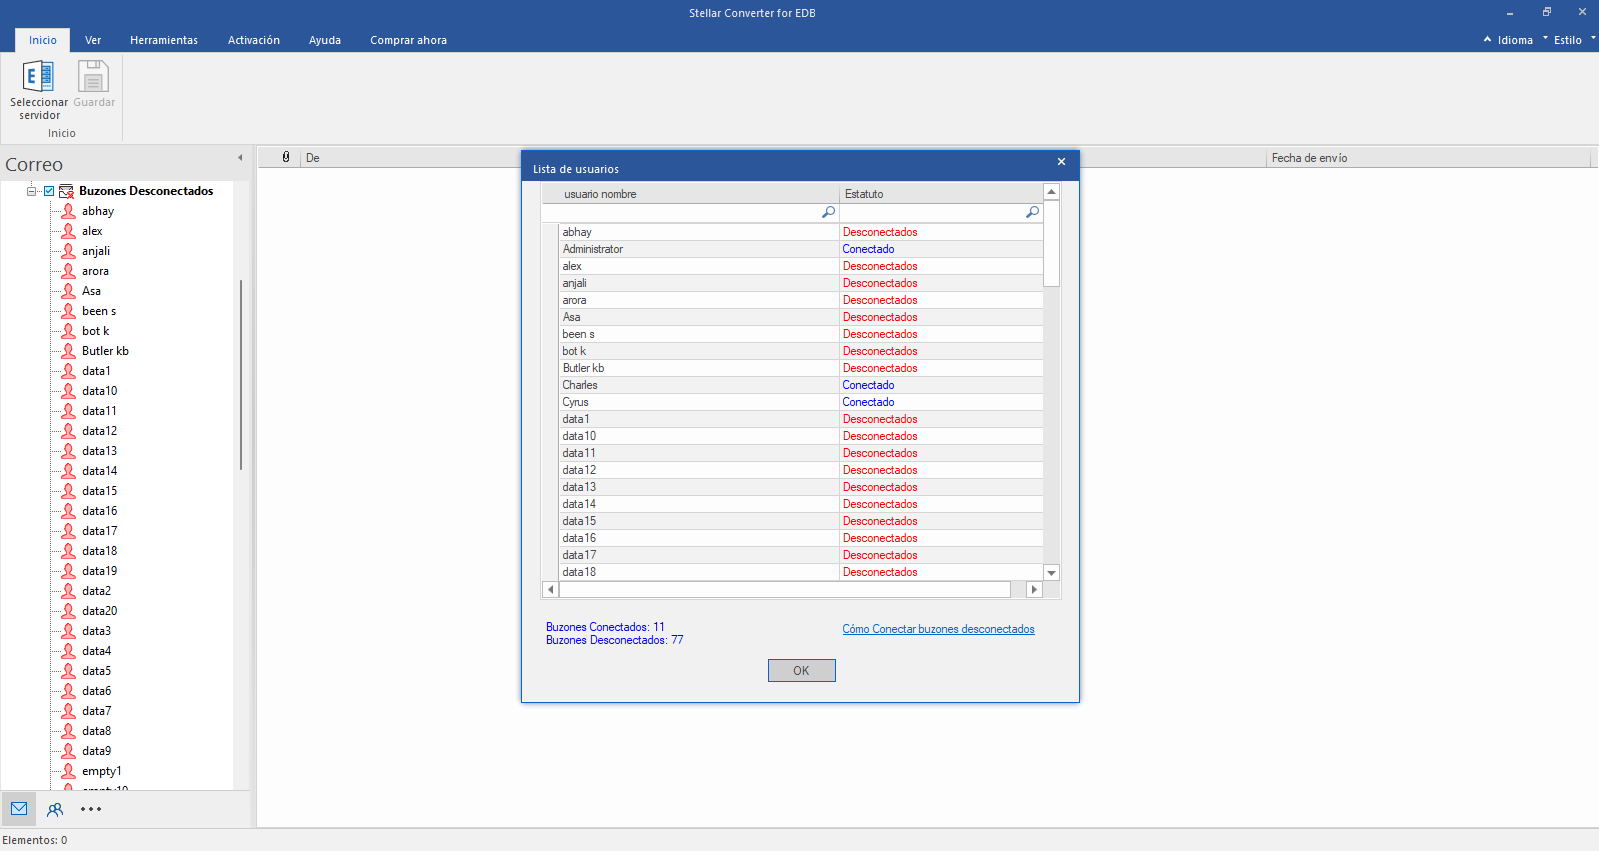
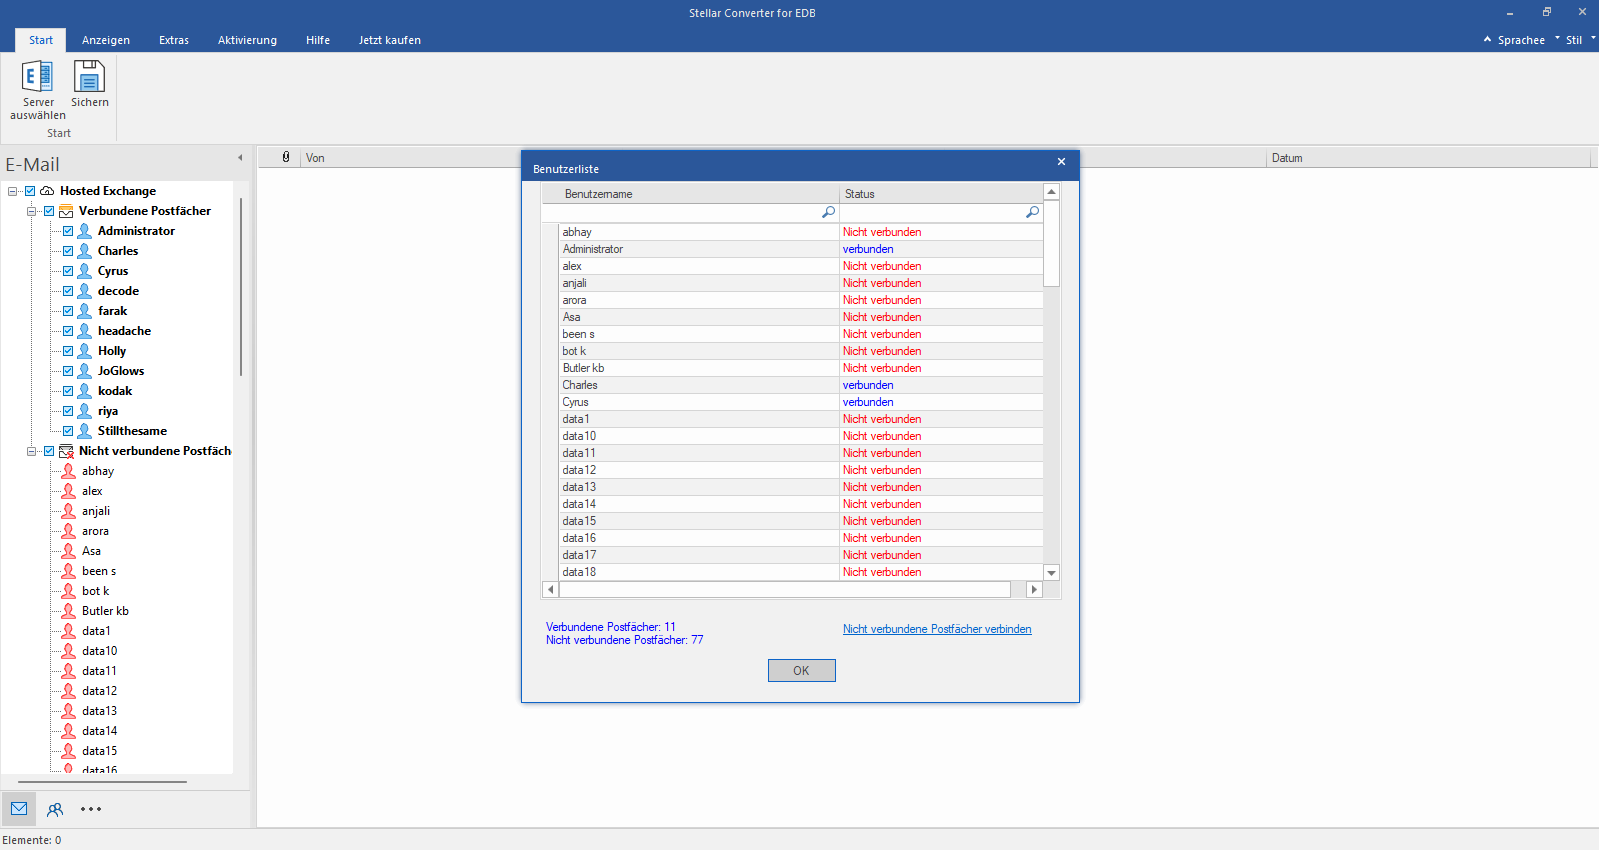
    Check Connected/Disconnected Mailbox Status

    After establishing the connection with Exchange Server, Next window displays list of connected and disconnected mailboxes. Click "OK" to proceed.

  • Step 4

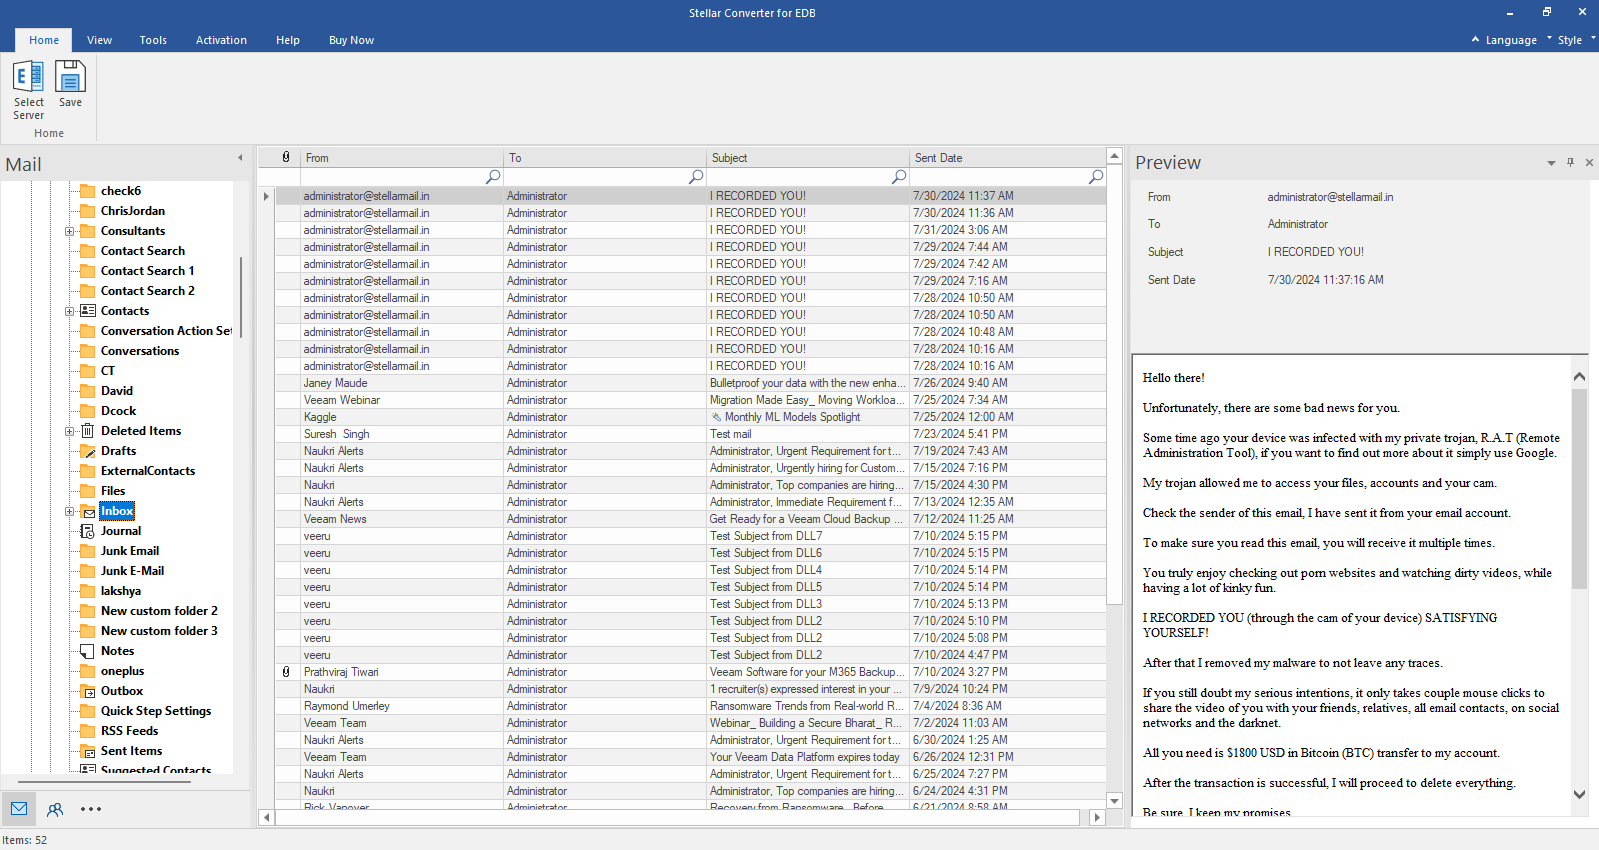
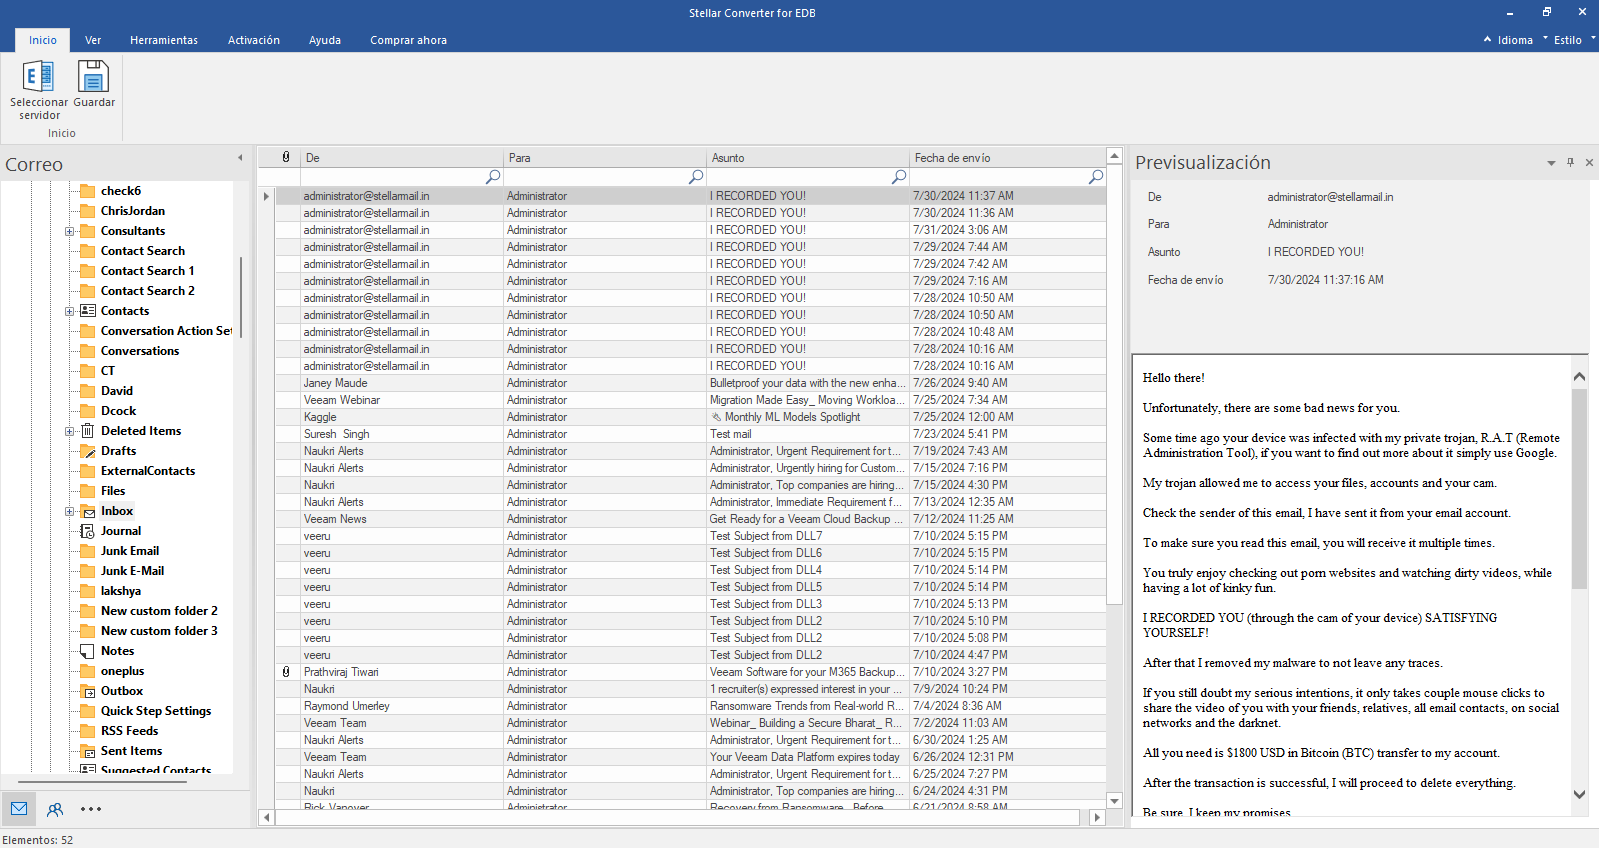
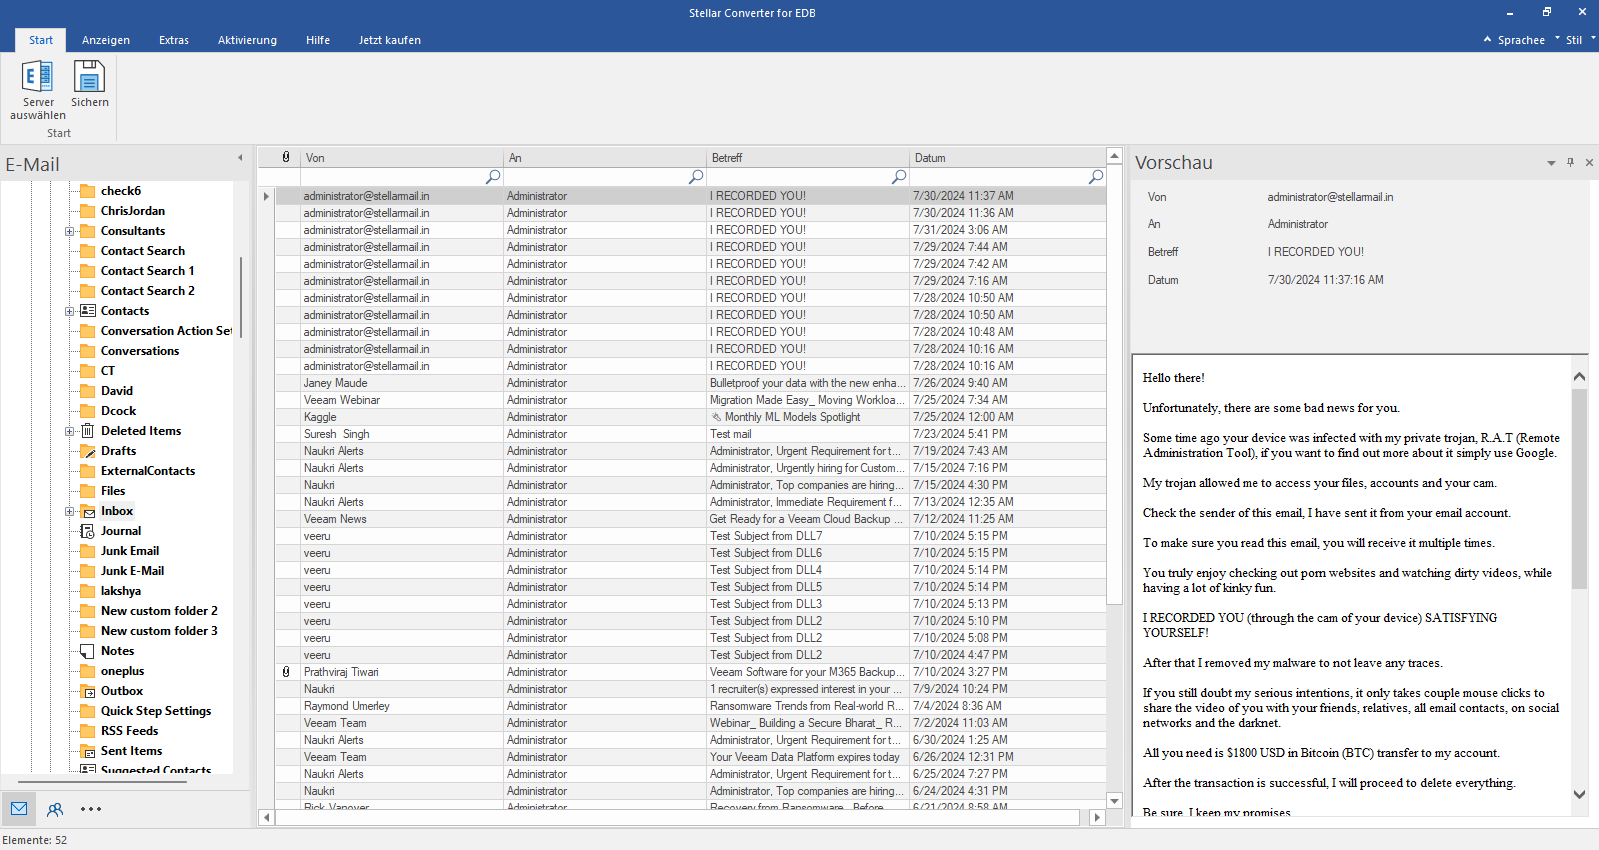
    Check the Preview of all Mailboxes

    Check the preview of all mailbox items- Emails, Calendars, Contacts etc.

  • Step 5

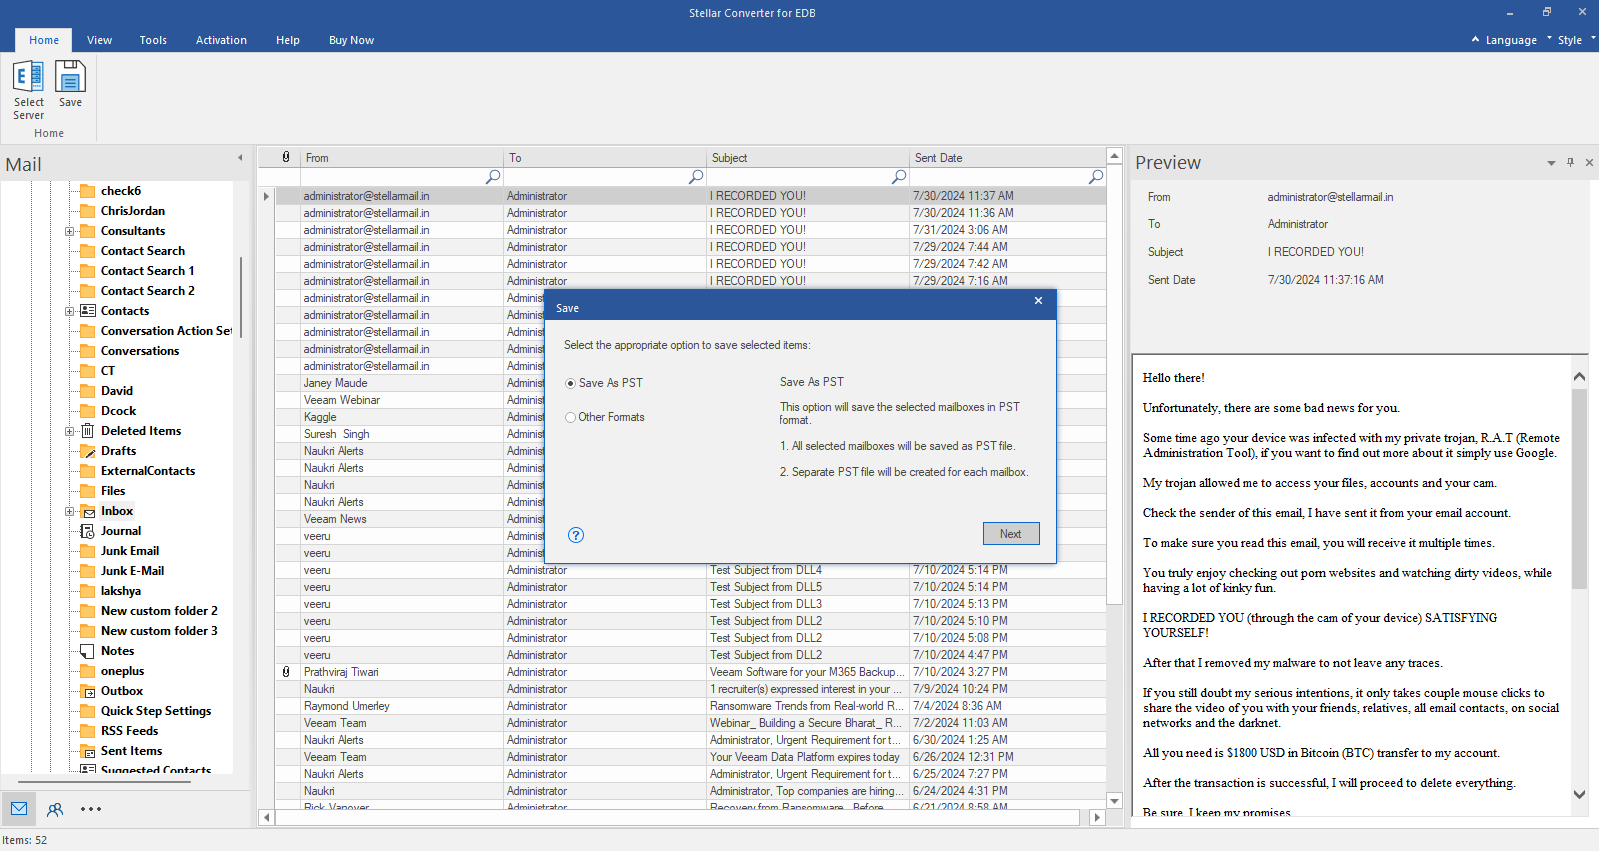
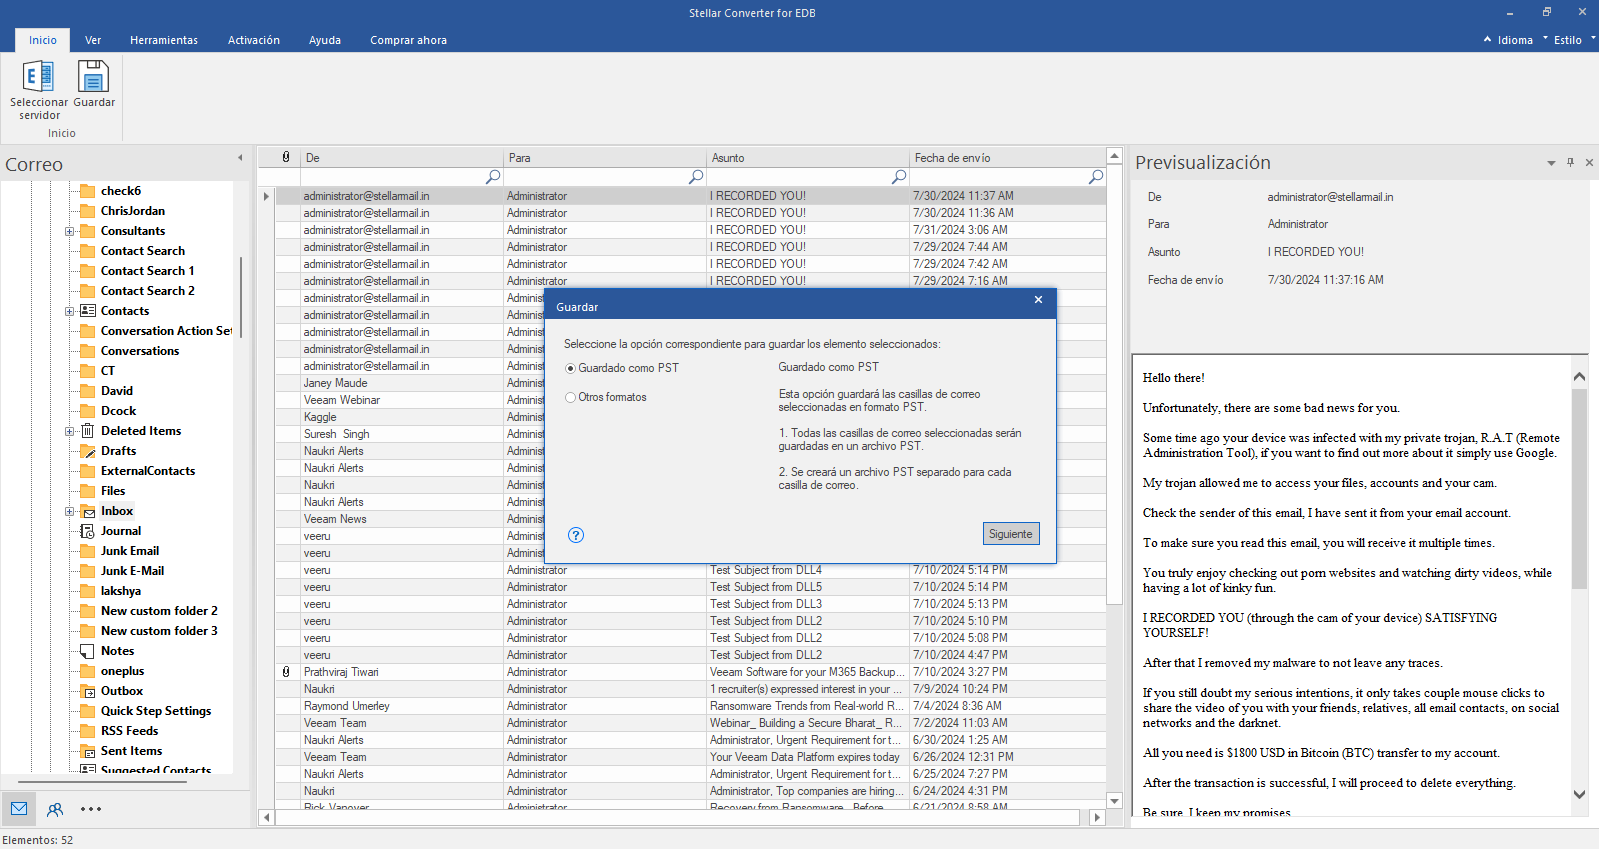
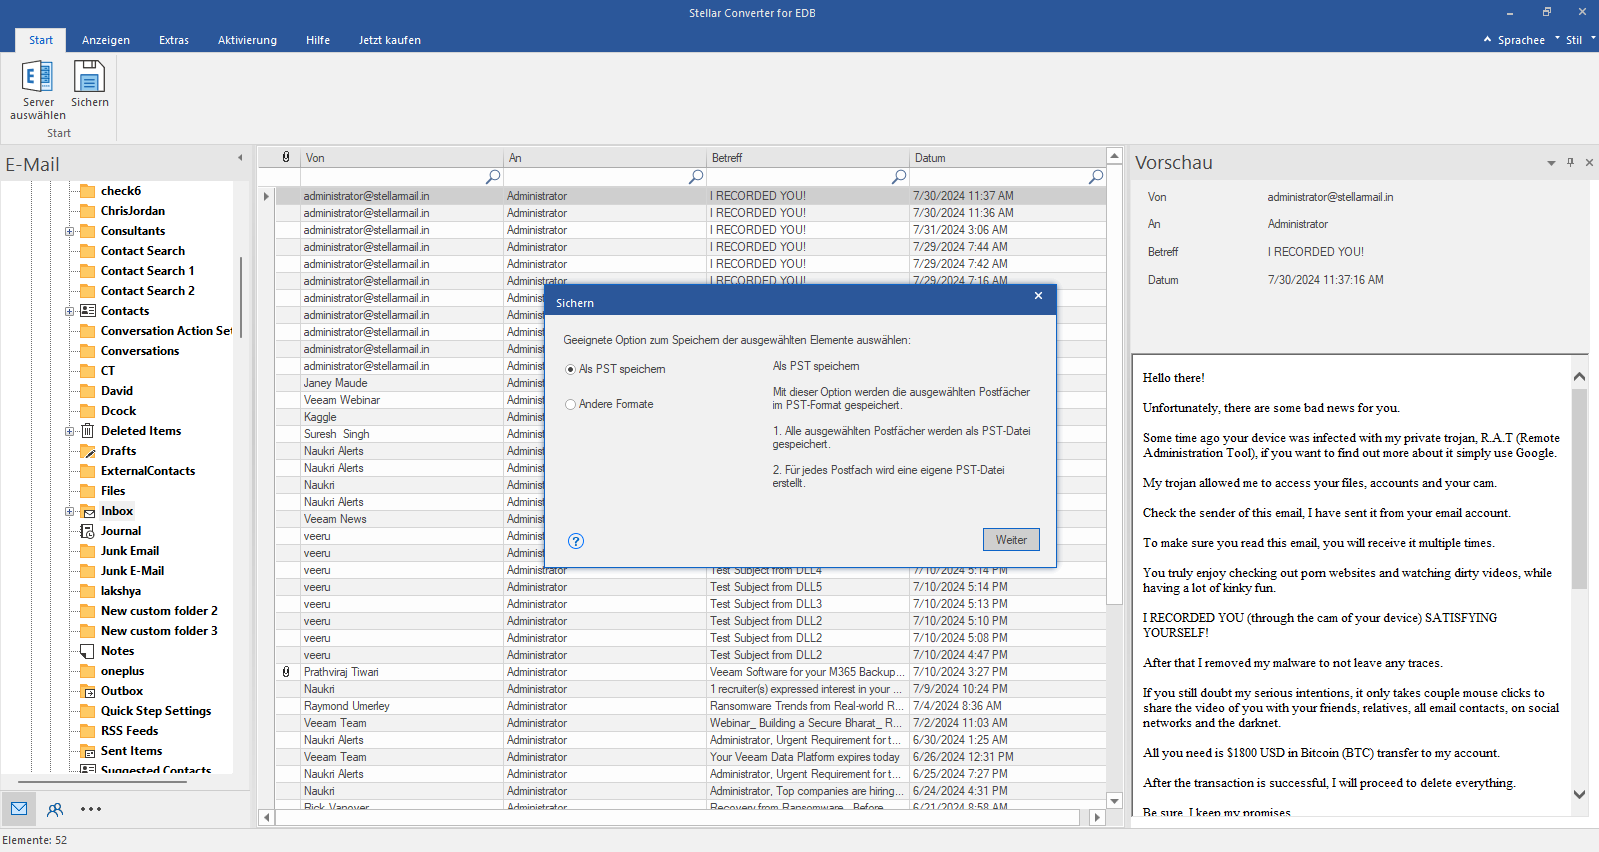
    Select “Save as PST”

    Click Save from Home Ribbon and Select Save as PST option. Click "Next" to proceed.

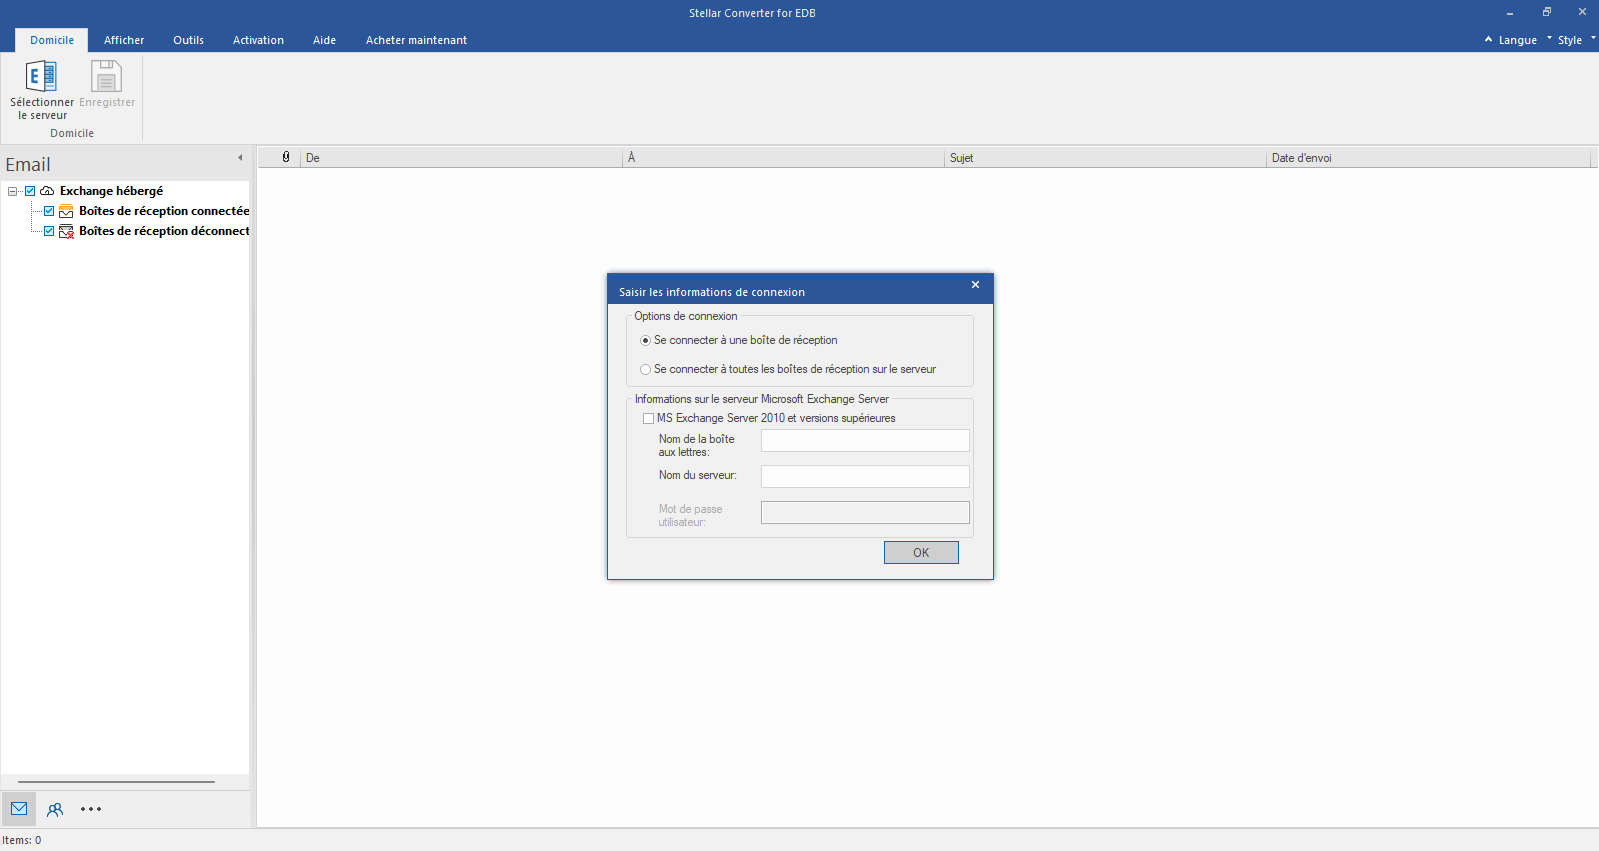
  • Étape 1

    Sélectionnez Hosted Exchange et entrez vos données de connexion.

    Sélectionnez Hosted Exchange pour exporter des boîtes aux lettres à partir d'un fichier EDB en ligne. Sélectionnez Connecter à une seule boîte aux lettres ou Connecter à une seule boîte aux lettres dans les options de connexion.

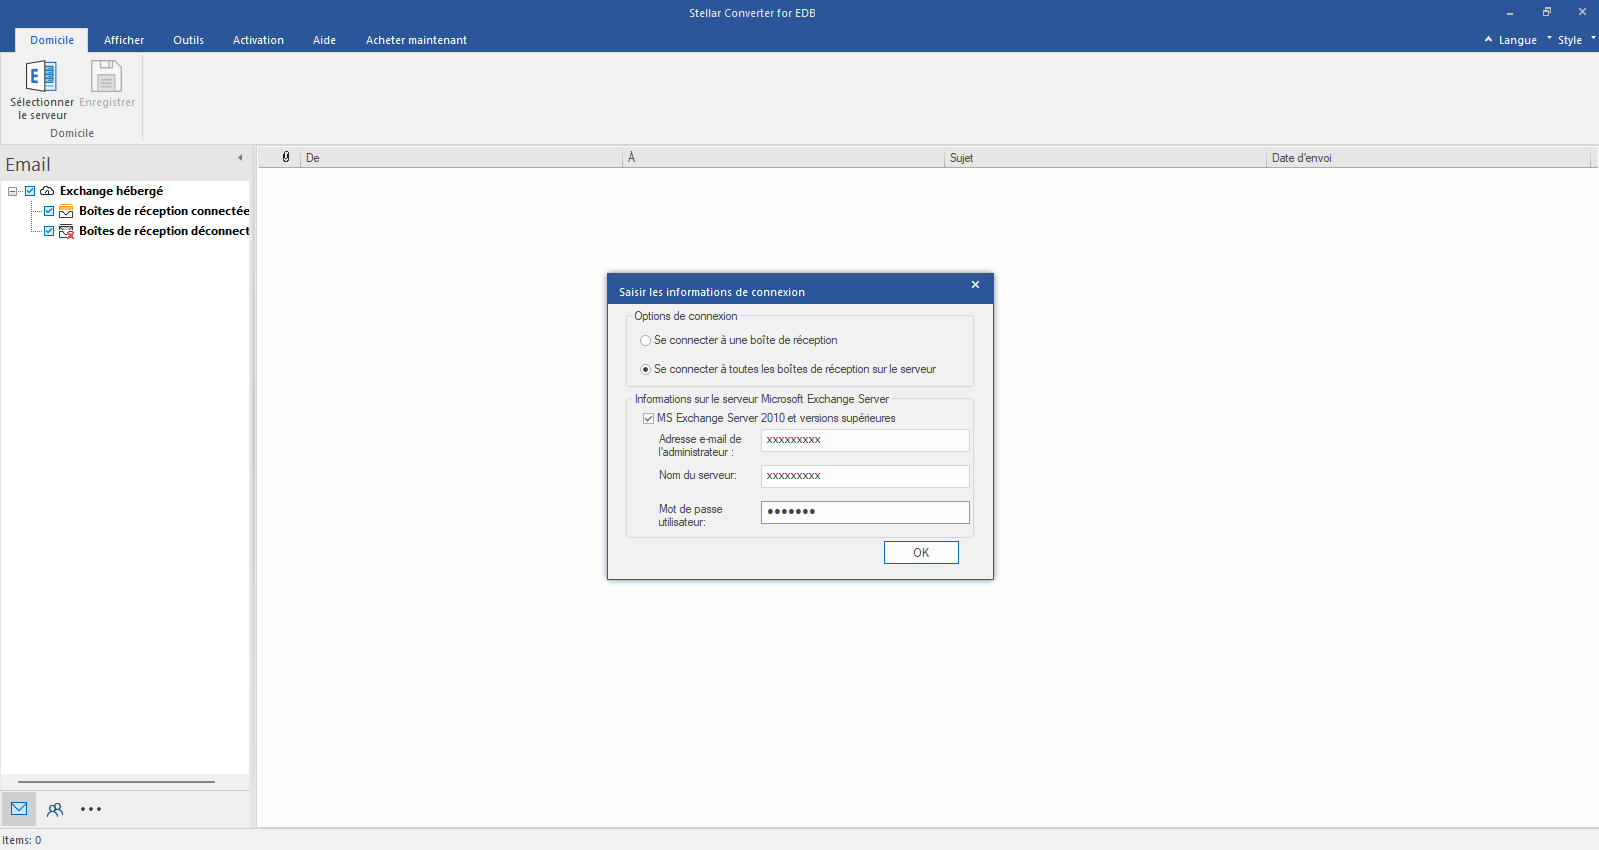
  • Étape 2

    Saisissez l'adresse électronique de l'administrateur et le nom du serveur

    Saisissez le courriel de l'administrateur et le nom du serveur (pour Exchange 5.5, 2000, 2003, 2007) ou cochez la case "Exchange Server 2010 and higher" pour saisir le courriel de l'administrateur, le nom du serveur et le mot de passe (pour MS Exchange 2010, 2013, 2016 et 2019). Cliquez sur OK.

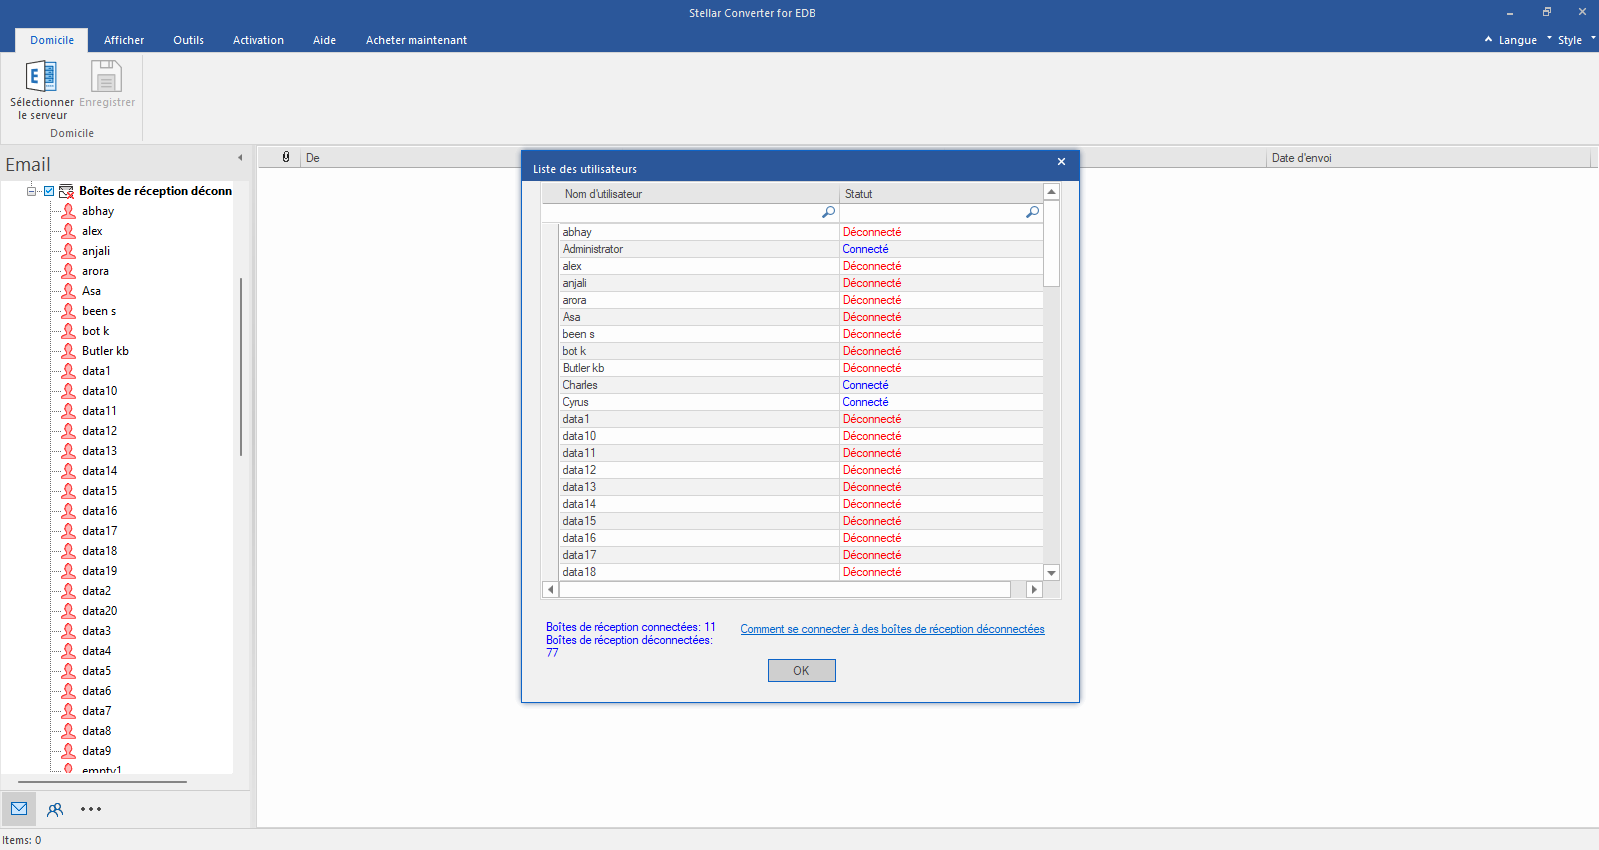
  • Étape 3

    Vérifier l'état de la boîte aux lettres connectée/déconnectée

    Une fois la connexion à Exchange Server établie, une liste des boîtes aux lettres connectées et déconnectées s'affiche dans la fenêtre suivante. Cliquez sur "OK" pour continuer.

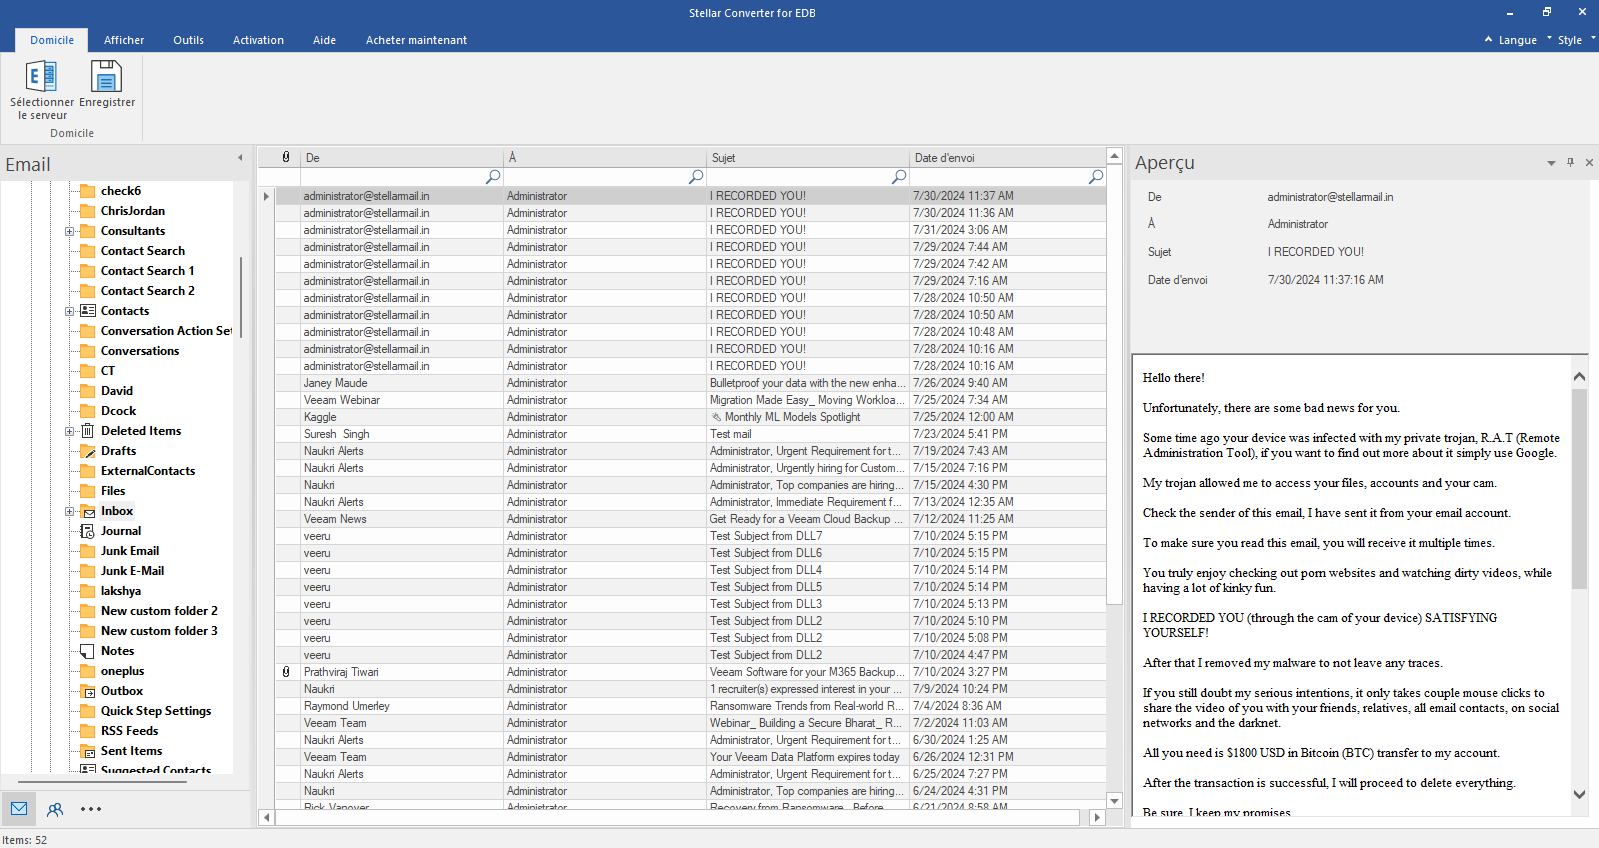
  • Étape 4

    Vérifier l'aperçu de toutes les boîtes aux lettres

    Vérifiez l'aperçu de toutes les boîtes aux lettres - courriels, calendrier, contacts, etc.

  • Étape 5

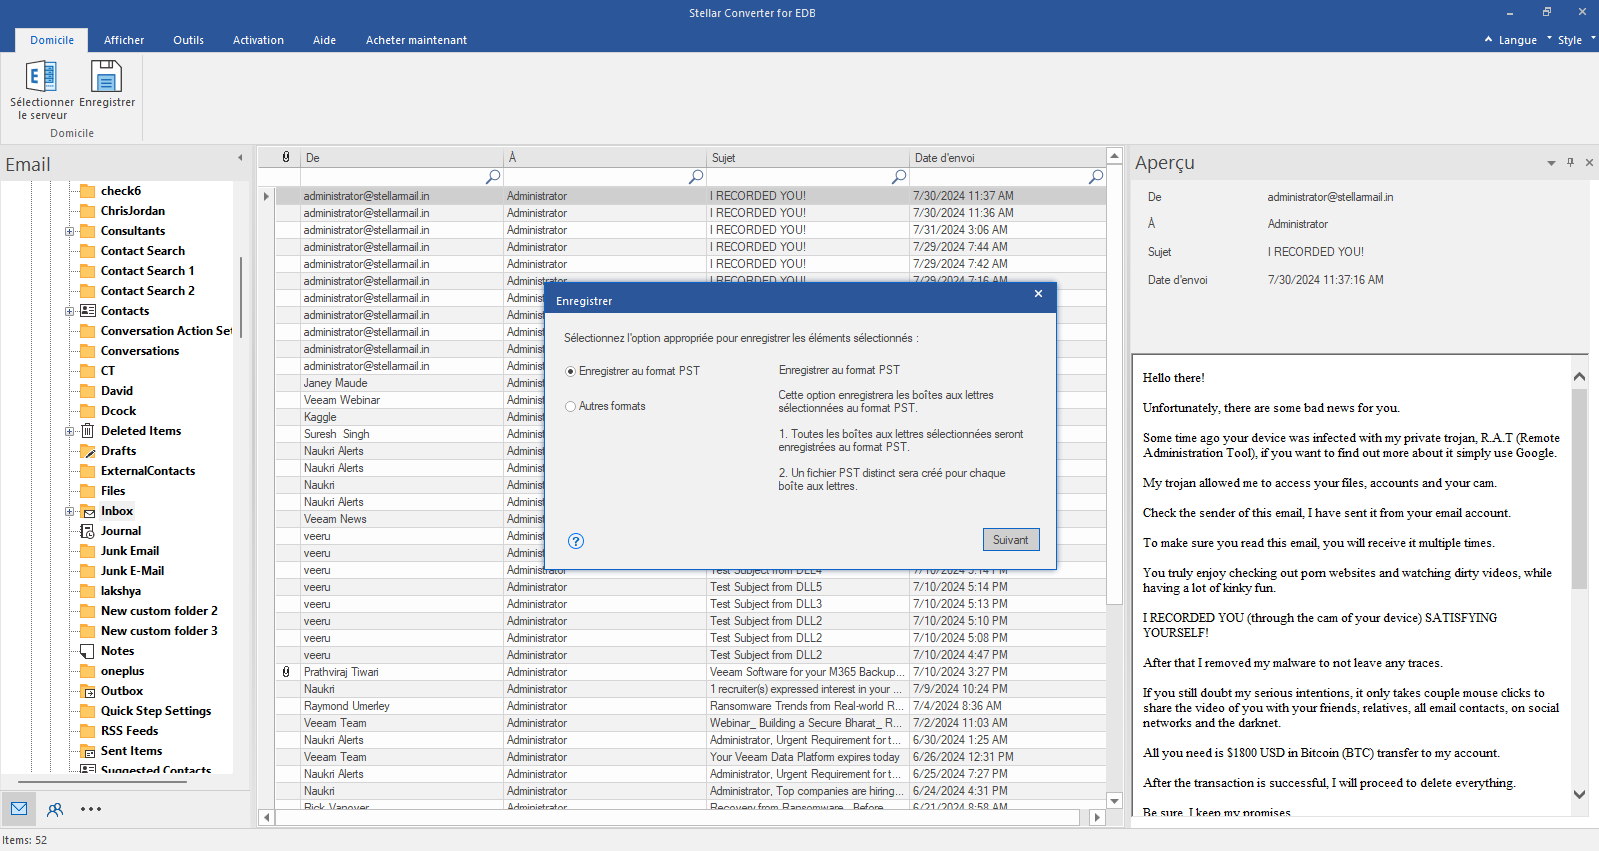
    Sélectionnez "Enregistrer sous PST".

    Cliquez sur Enregistrer dans le ruban Démarrer et sélectionnez l'option Enregistrer sous PST. Cliquez sur "Suivant" pour continuer.

  • Passo 1

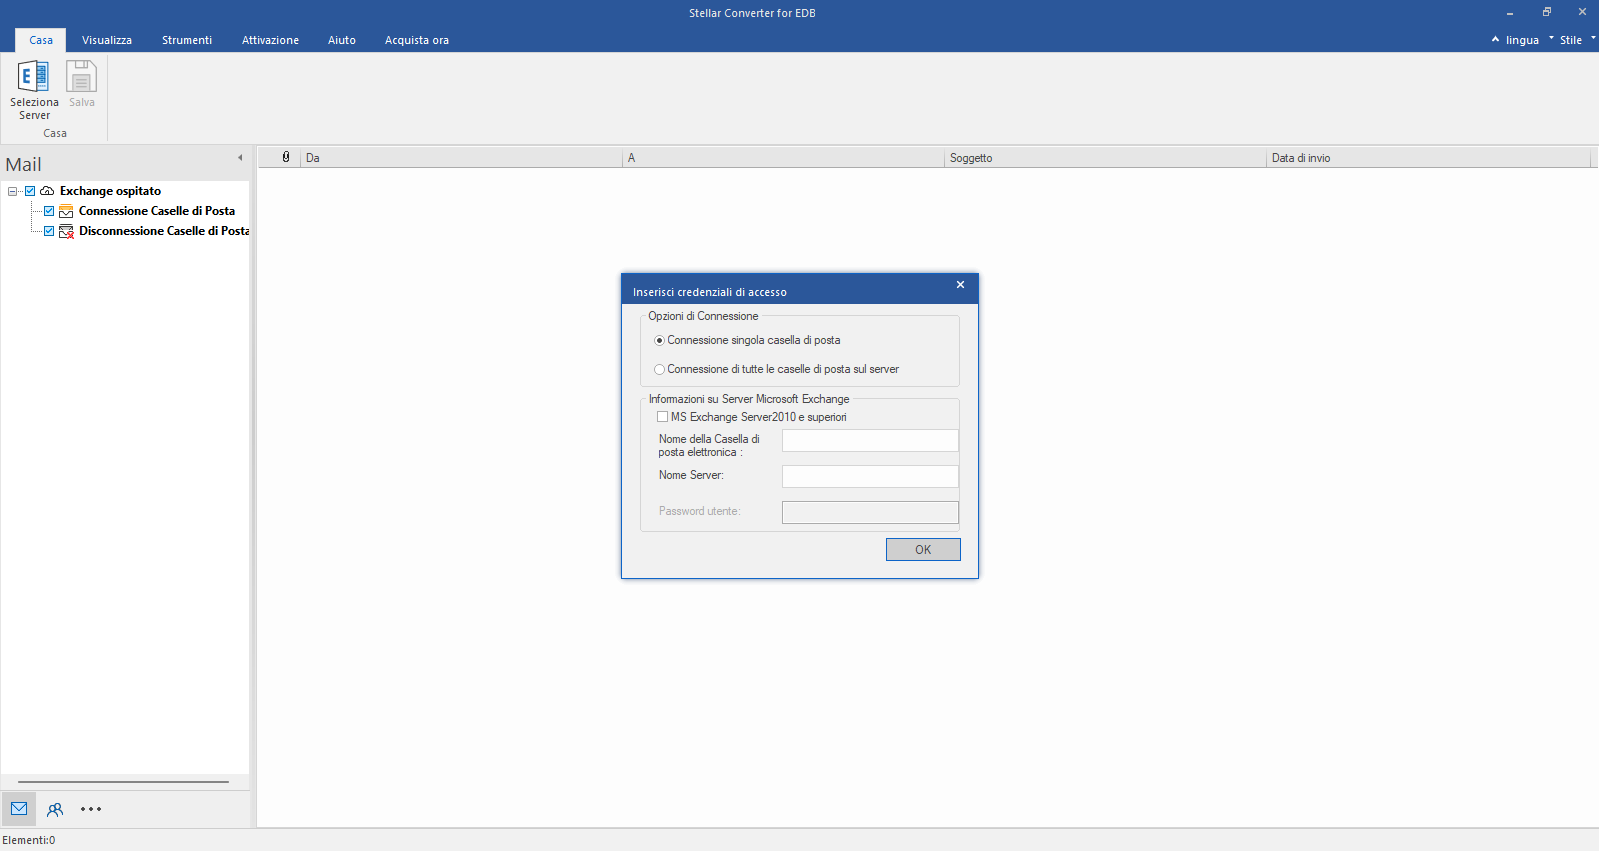
    Selezioni Hosted Exchange e inserisca i suoi dati di accesso.

    Selezioni Hosted Exchange per esportare le caselle postali da un file EDB online. Selezioni Connetti a una singola casella postale o Connetti a una singola casella postale dalle opzioni di connessione.

  • Passo 2

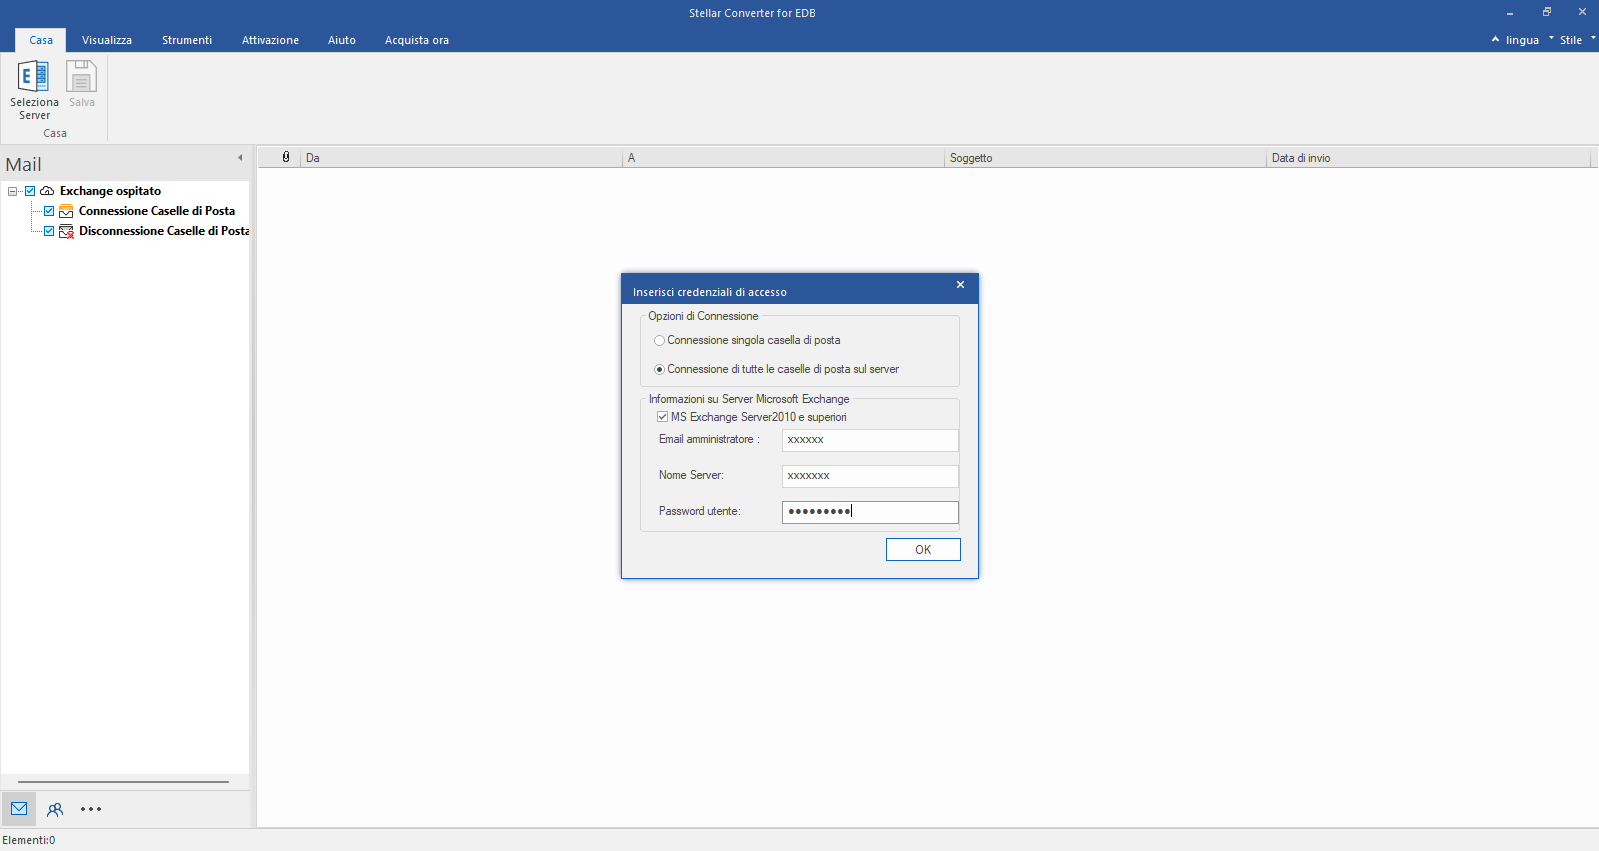
    Inserisca l'e-mail dell'amministratore e il nome del server

    Inserisca il nome dell'amministratore e del server (per Exchange 5.5, 2000, 2003, 2007) o selezioni la casella di controllo "Exchange Server 2010 e superiore" per inserire l'e-mail dell'amministratore, il nome del server e la password (per MS Exchange 2010, 2013, 2016 e 2019). Clicchi su OK.

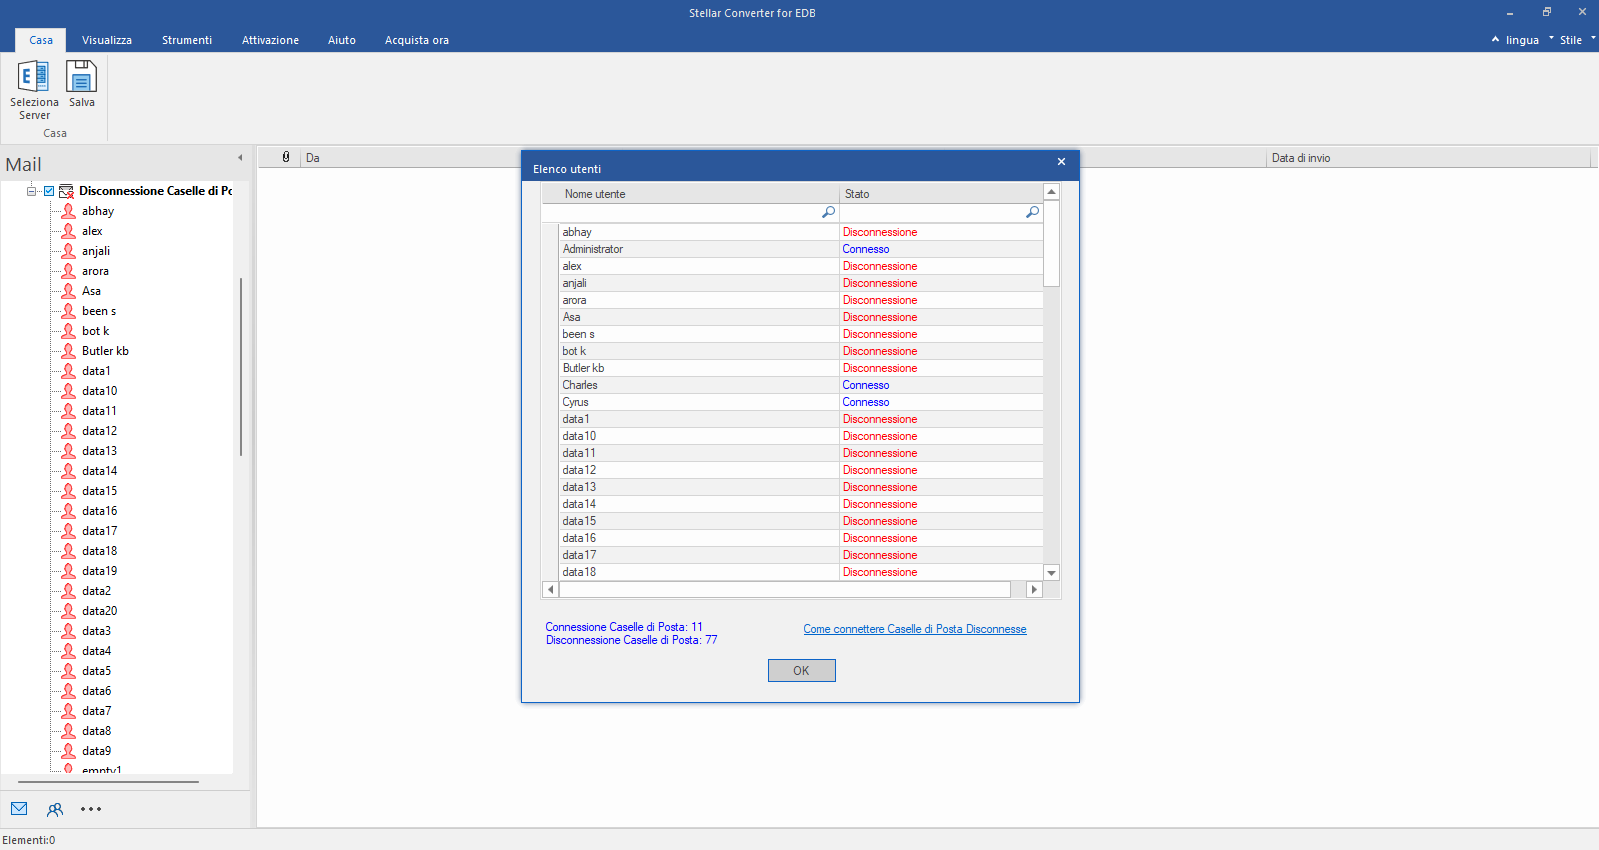
  • Passo 3

    Controlli lo stato della mailbox collegata/disconnessa.

    Una volta stabilita la connessione a Exchange Server, nella finestra successiva viene visualizzato un elenco di caselle postali collegate e scollegate. Clicchi su "OK" per continuare.

  • Passo 4

    Controlli l'anteprima di tutte le cassette postali

    Controlli l'anteprima di tutte le caselle di posta elettronica - e-mail, calendario, contatti, ecc.

  • Passo 5

    Selezionare "Salva come PST".

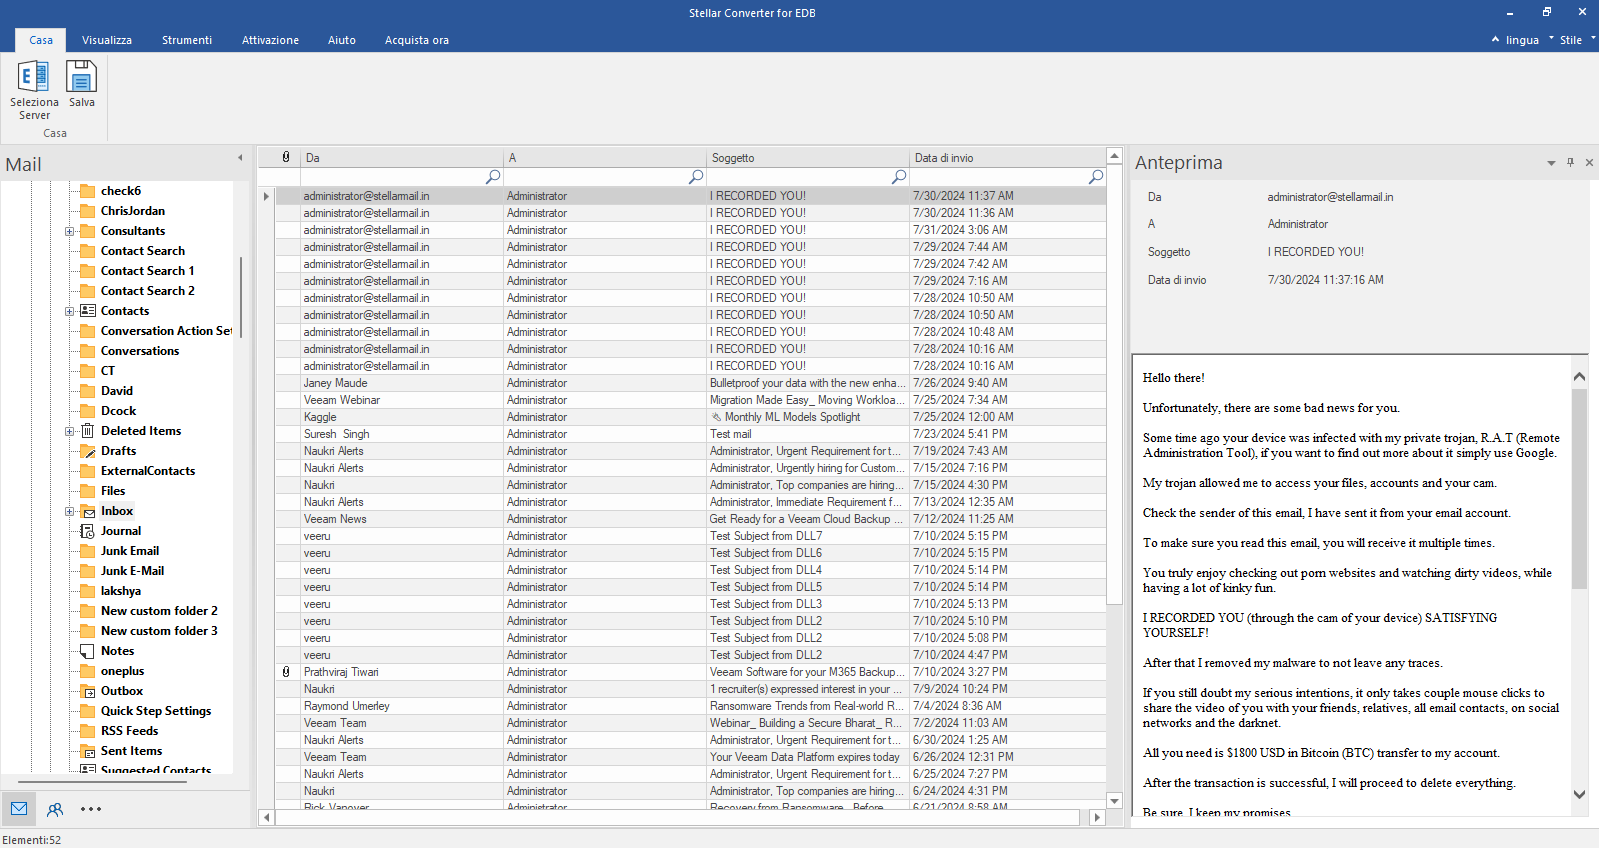
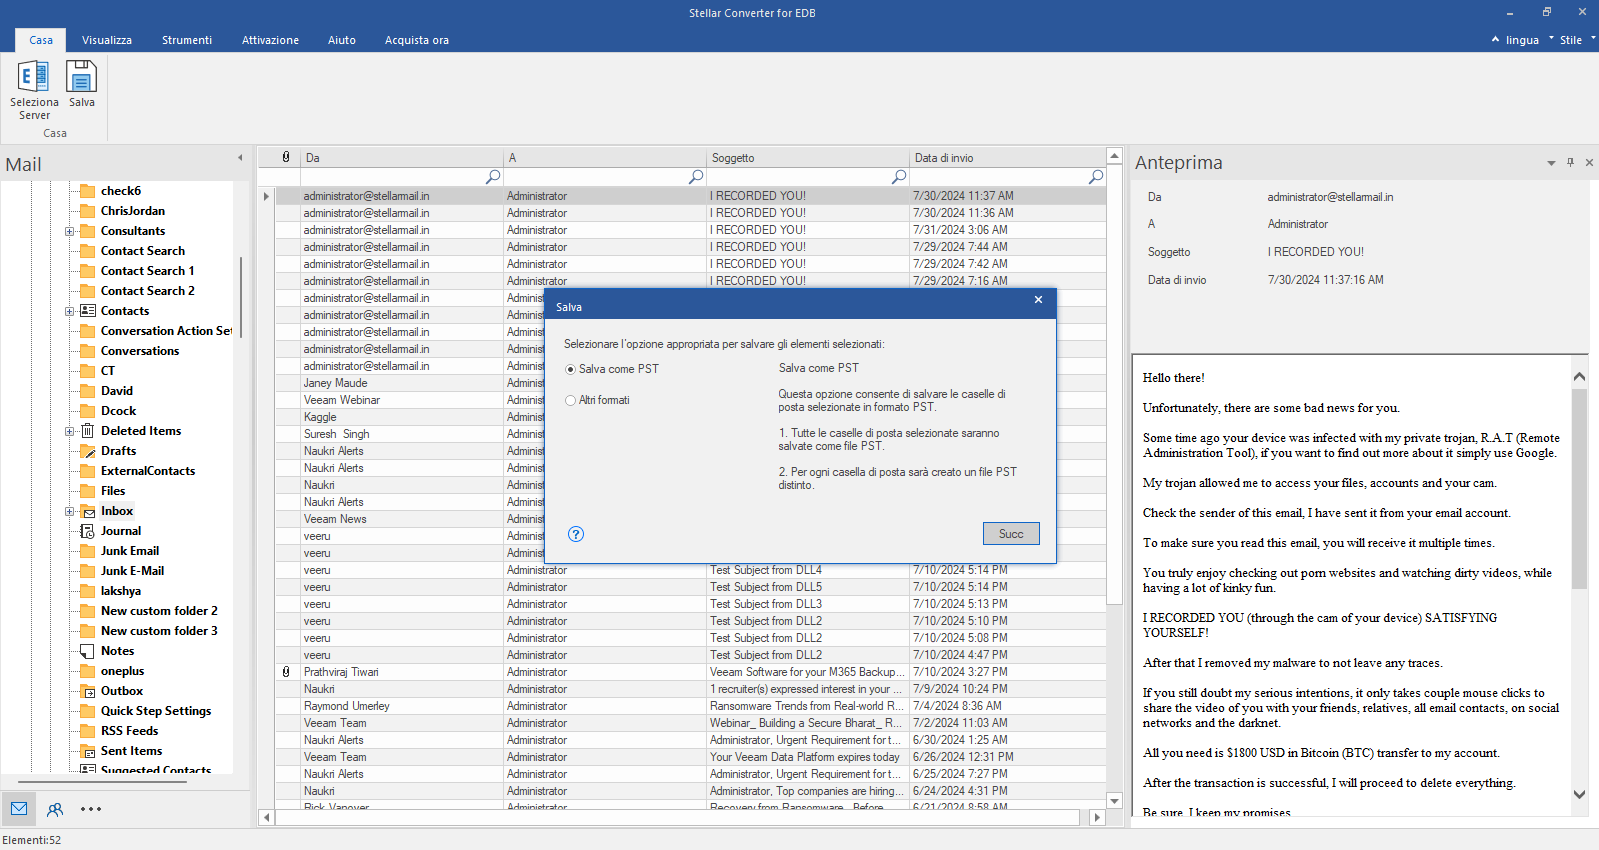
    Clicchi su Salva nella barra multifunzione Avvio e selezioni l'opzione Salva come PST. Clicchi su "Avanti" per continuare.

  • Paso 1

    Seleccione Hosted Exchange e introduzca sus datos de acceso.

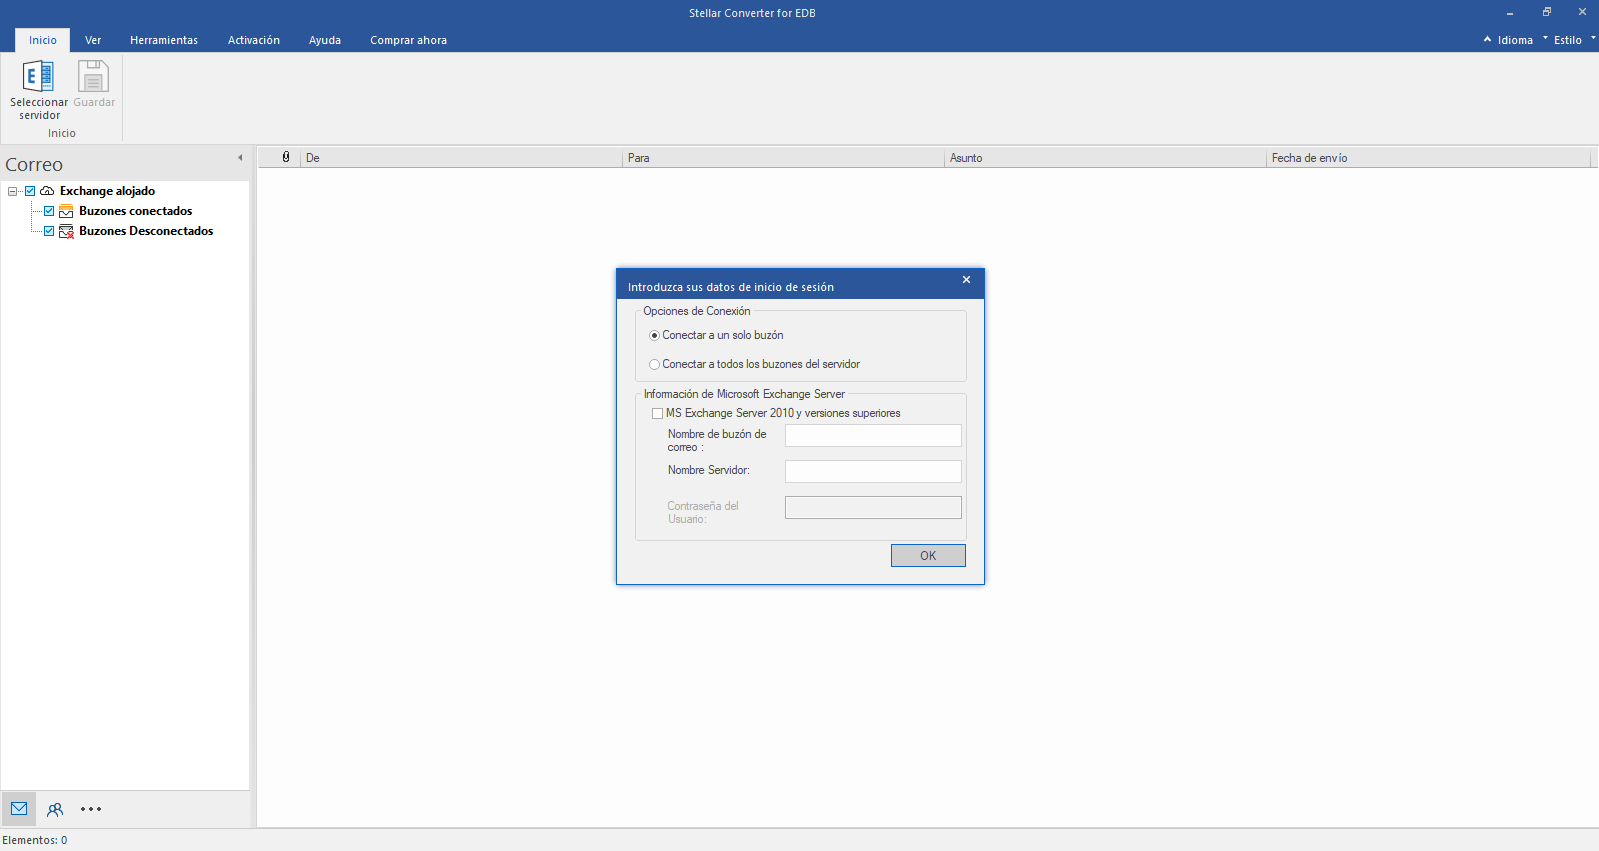
    Seleccione Hosted Exchange para exportar buzones desde un archivo EDB en línea. Seleccione Conectarse a un único buzón o Conectarse a un único buzón en las opciones de conexión.

  • Paso 2

    Introduzca el correo electrónico del administrador y el nombre del servidor

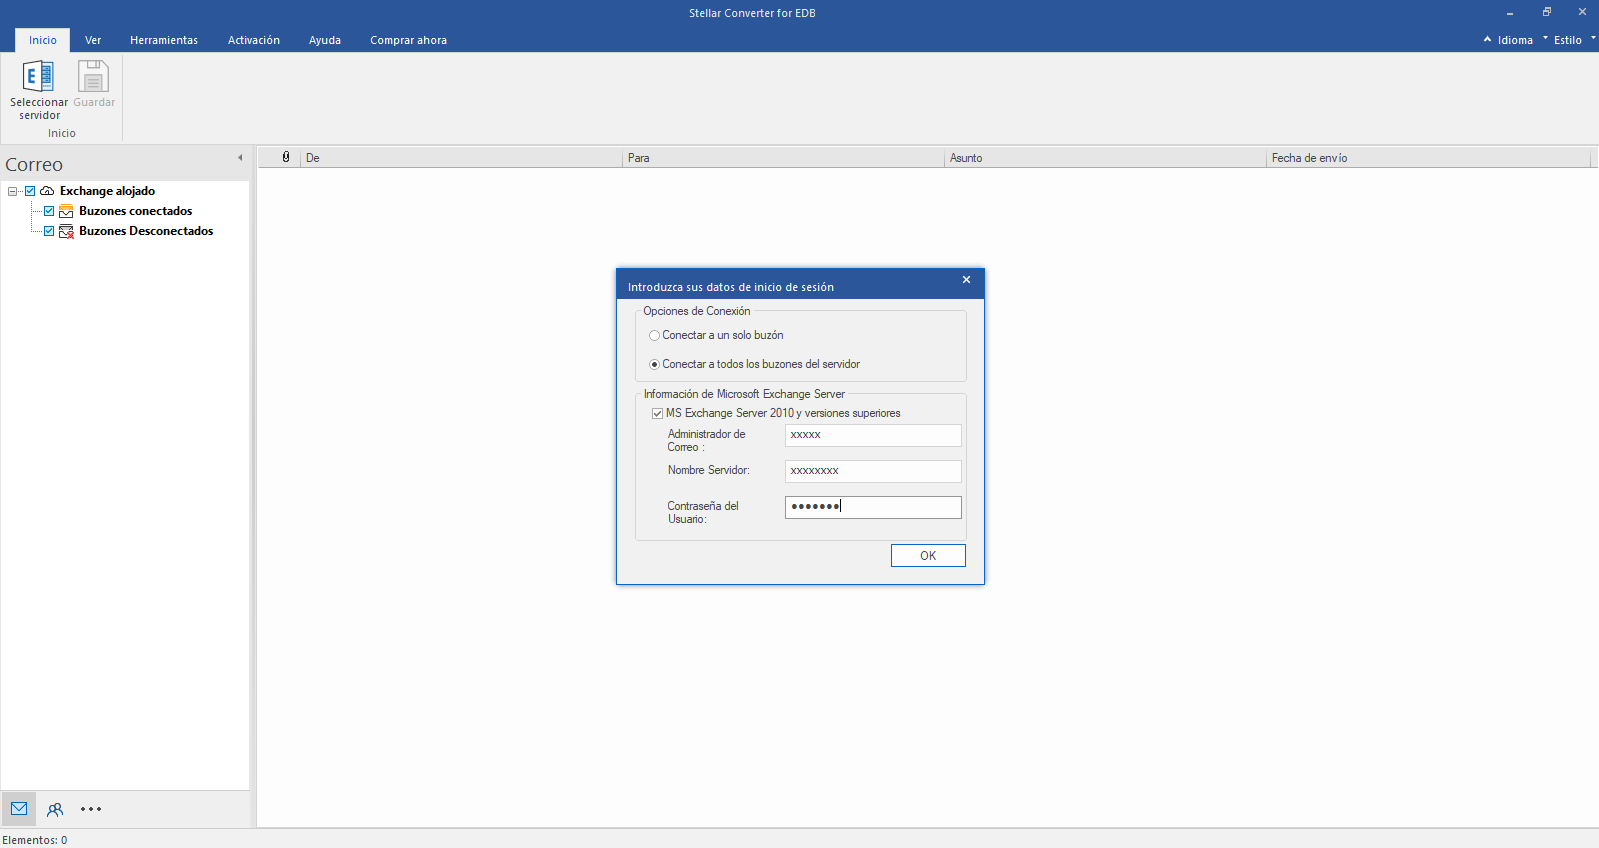
    Introduzca el correo electrónico del administrador y el nombre del servidor (para Exchange 5.5, 2000, 2003, 2007) o marque la casilla "Exchange Server 2010 y superior" para introducir el correo electrónico del administrador, el nombre del servidor y la contraseña (para MS Exchange 2010, 2013, 2016 y 2019). Haga clic en Aceptar.

  • Paso 3

    Comprobar el estado del buzón conectado/desconectado

    Una vez establecida la conexión con Exchange Server, en la siguiente ventana aparecerá una lista de los buzones conectados y desconectados. Haga clic en "Aceptar" para continuar.

  • Paso 4

    Comprobar la vista previa de todos los buzones

    Compruebe la vista previa de todos los buzones: correos electrónicos, calendario, contactos, etc.

  • Paso 5

    Seleccione "Guardar como PST".

    Haga clic en Guardar en la cinta Inicio y seleccione la opción Guardar como PST. Haga clic en "Siguiente" para continuar.

  • Schritt 1

    Wählen Sie Hosted Exchange und geben Sie Ihre Anmeldedaten ein.

    Wählen Sie Hosted Exchange, um Postfächer aus einer Online-EDB-Datei zu exportieren. Wählen Sie Verbinden mit einem einzelnen Postfach oder Verbinden mit einem einzelnen Postfach aus den Verbindungsoptionen

  • Schritt 2

    Admin-E-Mail und Servernamen eingeben

    Geben Sie admin und den Servernamen ein (für Exchange 5.5, 2000, 2003, 2007) oder aktivieren Sie das Kontrollkästchen "Exchange Server 2010 und höher", um admin E-Mail, Servernamen und Passwort einzugeben (für MS Exchange 2010, 2013, 2016 und 2019). Klicken Sie auf OK.

  • Schritt 3

    Prüfen Sie den Status der verbundenen/getrennten Mailbox

    Sobald die Verbindung zu Exchange Server hergestellt ist, wird im nächsten Fenster eine Liste der verbundenen und nicht verbundenen Postfächer angezeigt. Klicken Sie auf "OK", um fortzufahren.

  • Schritt 4

    Prüfen Sie die Vorschau aller Postfächer

    Prüfen Sie die Vorschau aller Postfächer - E-Mails, Kalender, Kontakte, etc.

  • Schritt 5

    Wählen Sie "Als PST speichern".

    Klicken Sie im Menüband Start auf Speichern und wählen Sie die Option Als PST speichern. Klicken Sie auf "Weiter", um fortzufahren.

  • Repair a corrupt PST file with Stellar Repair for Outlook?

  • Effortlessly repair large PST file and Migrate to Office 365/M365

  • Use ScanPST (Inbox Repair Tool) to repair PST files for free

  • Find the ScanPST.exe location in a few steps

  • Stellar Toolkit for Outlook to repair PST, convert OST to PST, Split, Compact etc.

TRY BEFORE YOU BUY

Free Trial Download

  • No File Size Limitations
  • Trusted by Millions of Users
  • Awarded by Top Tech Media
  • 100% Safe & Secure to Use

*Download the free trial version to repair & view your PST file’s mailbox items.

×